Tasks in Nozbe
- What is a task
- How to add a new task
- Task’s parameters
- Setting parameters with hashtags
- Advanced recurrences
- How can I edit a new task
- Multi-editing
- Icons on a task
- Inline activity
- Task’s menu
- How to clone a task
- How to move a task to another space
- How to convert a task into a project
- How to complete a task
- Drag and drop
- ProTip: How to handle a chain of tasks in Nozbe
- Short Video: Why links to the tasks are useful
What is a task
A task is a single thing that can be done in one step.
Anything you can usually do in a single sitting can be a task: watering the flowers, preparing a report, or buying a birthday present for your coworker.
How to add a new task
To add a task, go to your Priority, Single tasks, a Project, or a Tag view and tap on the big “+” button in the bottom right-hand corner. A task input bar will open.
Type in your task’s name and confirm by hitting the Enter key or the arrow located on the right side of that bar. You will add a new task to the current view.
If you add a task within your Priority view, it’s location will be automatically set to Single tasks.
Task’s parameters
While adding a task, it’s better to add various details to it.

You can:
- Set additional task parameters.
- Immediately add a comment to your task.
- Attach files to the task.
- Confirm adding the task.
Setting additional parameters
When you hit the parameters icon, you will see additional parameters that can be set for your task.

Here you can:
- specify whether you want to add the task to the top or to the bottom of your task list.
- use a hashtag to set additional parameters (project, recurrence, tags etc.).
- assign the task to someone else.
- add a due date.
- add a reminder.
- add a tag.
- add a star to make it a Priority.
Hit the arrow on the right to confirm adding your task.
If you forgot to set the task’s parameters before adding it, don’t worry - you can change the task’s details at any time.
ProTip: sharing singular tasks
In Nozbe, you can share just one task with another space member or anyone in the world. Find out how to share singular tasks
Setting parameters with hashtags
You can use hashtags to set additional parameters. Just type ‘#’ after a task’s name or hit the “#” button in the task input bar, and you will see a pop-up with all available options.
For due dates and reminders, you can also specify the time. For example, typing in `#May 23 2:00 pm" will allow you to add a due date set to May 23rd at 2:00 pm. If no date is set when setting the recurrence, the system will automatically set the start day to today.
Advanced recurrences
Do you need to specify how often a task should repeat? Before setting up a “repeat” parameter on a task, set the due date first. Otherwise, you won’t be able to add the recurrence. The next occurences of that task will depend on the due date you’ve set.
When you add a new task, you can add the recurrence by clicking on the small calendar icon. Then you have to choose a starting date and the repeat option you want for that task.
Basic recurrences
The recurrence options you can select from the recurrences menu are:
- every day
- every 2 days
- every weekday
- every week
- every 2 weeks
- every month
- every year
- custom
Custom recurrences
If you want to choose a more complex recurring scheme for your task, choose “Custom” from the list of available recurrences.
Here, you can design a custom recurrence scheme:
- every X days
- every X weeks - select a particular weekday or multiple weekdays on which your task should repeat
- every X months - select on what day your task should repeat using one of the available presets or picking a specific day from the calendar
- every X years
For each option you can decide whether and when the recurrence should end. The available options are:
- never
- on date
- after X times
The recurring mechanism
The active version of a recurring task is called the master task.
When a recurring task renews, Nozbe creates a history task - the last completed version of that task. The history task includes snapshots of all comments from the previous master task, preserving their final state (such as the status of a checklist when the task was completed). This lets you see the exact state of the task at the last completion. You can find history tasks in the completed tasks list for each project or in the calendar.
Each master task also carries comments from previous task occurrences. The state of checklists in these comments depends on whether they’re pinned or unpinned.
Changing the date of a single occurrence
Sometimes you need to reschedule just one instance of a recurring task without affecting the rest of the series. For example: your task repeats on the 20th of every month, but in June you want to handle it a few days earlier.
When prompted, select “Only this task” to confirm the change applies to this occurrence only.
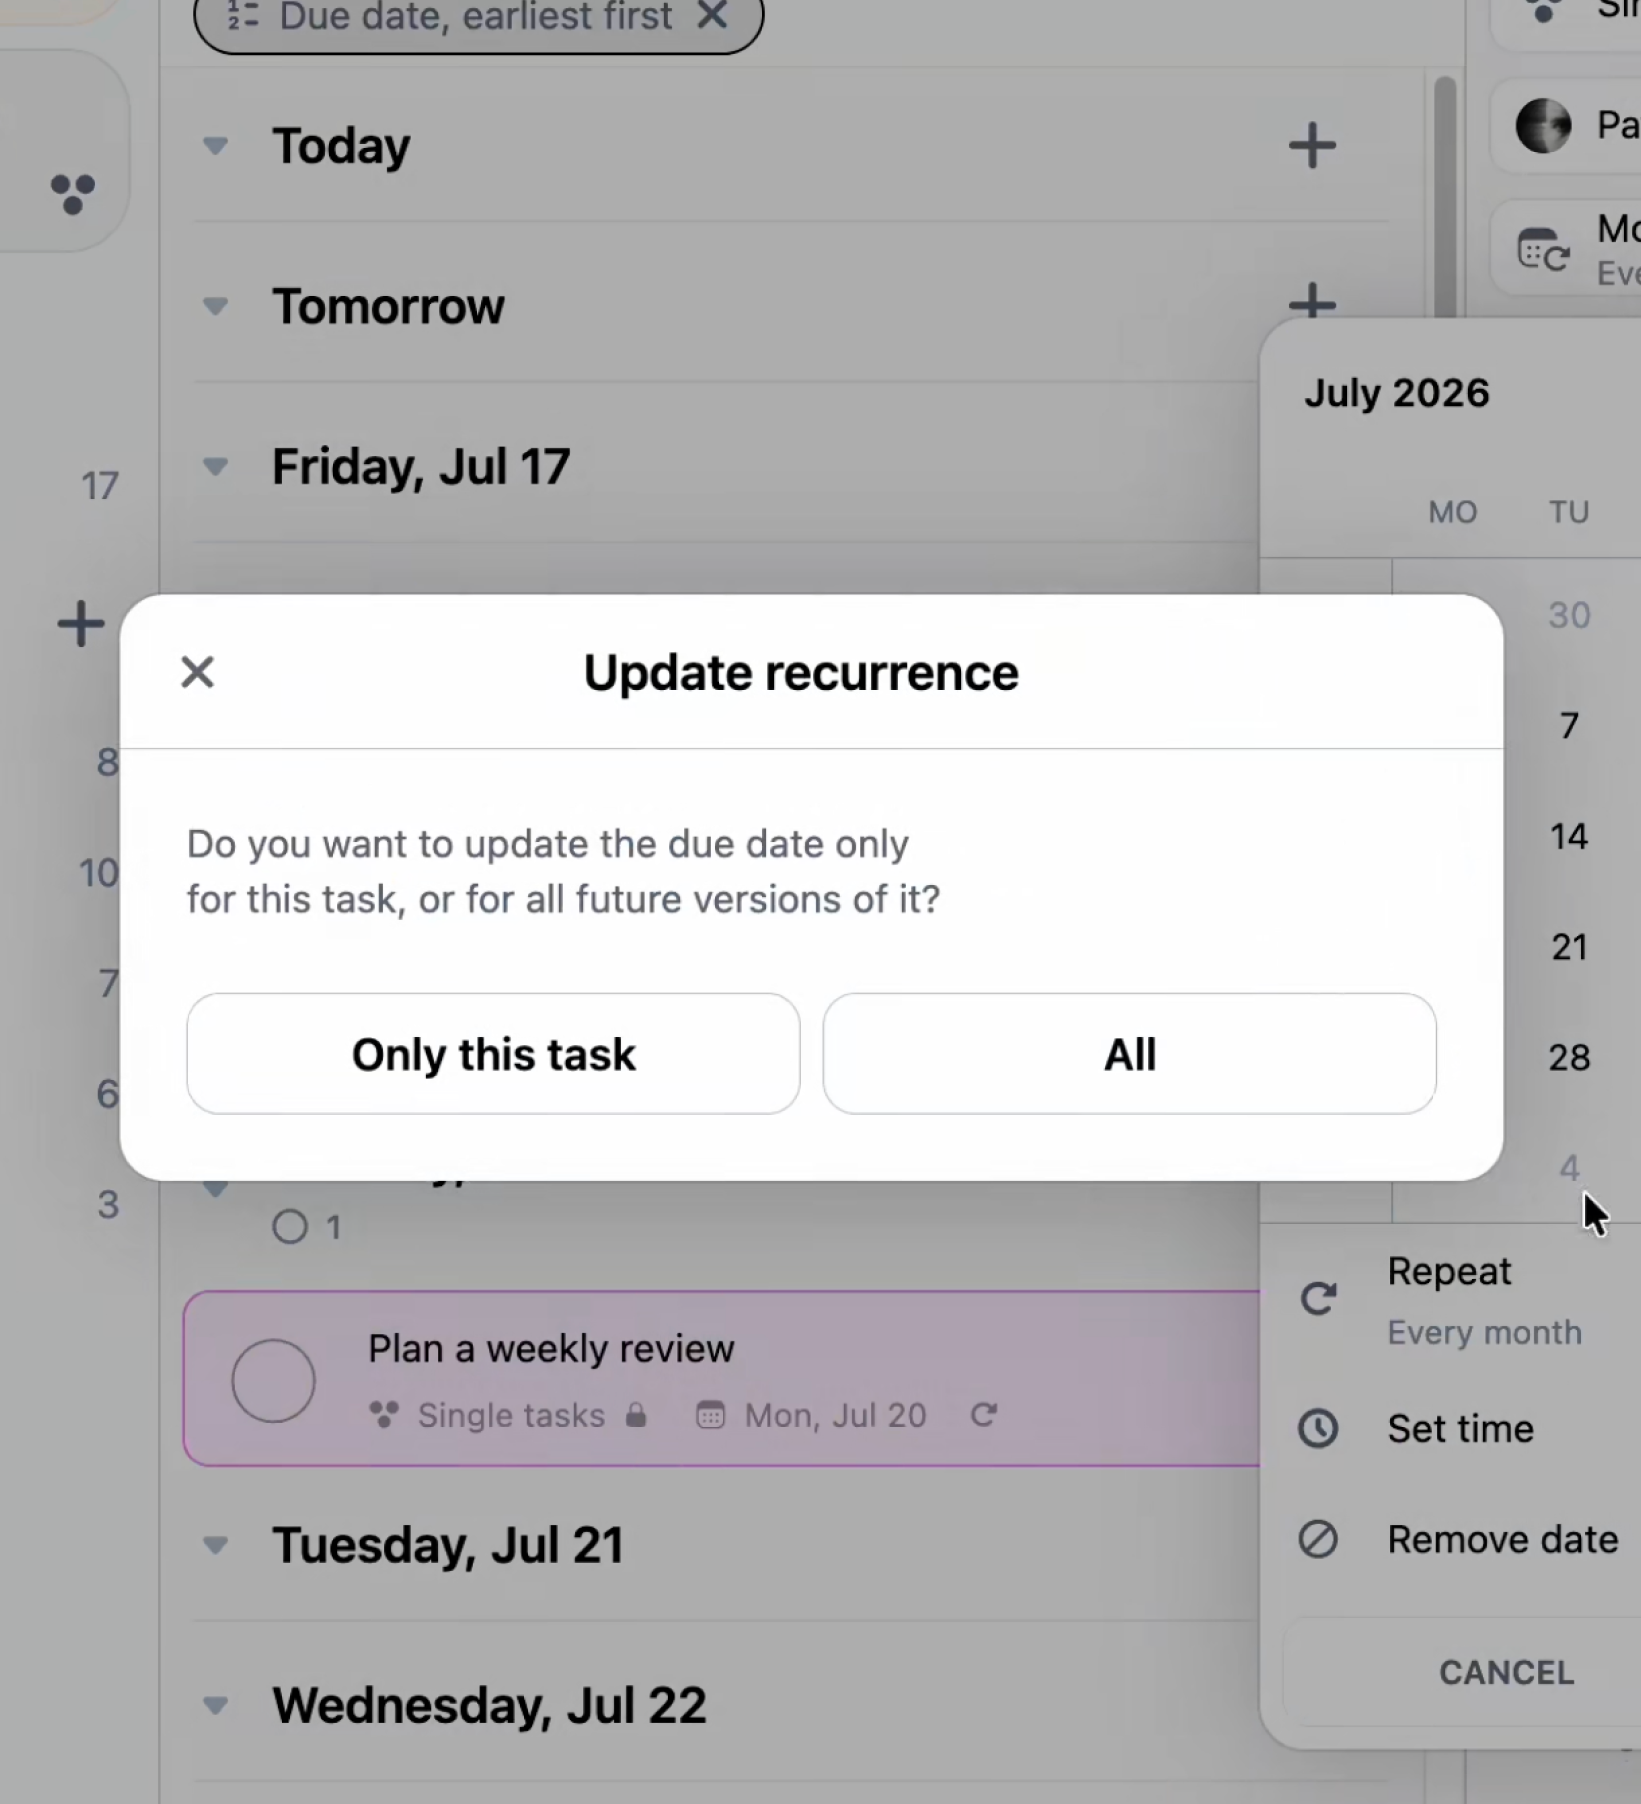
The July instance will now appear on the 17th, while all other monthly occurrences remain on the 20th as originally scheduled.
Things to know
Ghost tasks represent future occurrences of a recurring task. They become active tasks as their due date approaches. Editing “Only this task” affects just that one instance — the rest of the series stays unchanged. If you want to change the recurrence for all future tasks, open the task and edit the repeat settings, then select “This and all following tasks” when prompted.
Note: You will not receive a warning if the change does not affect the order in which the task occurs.
Checklists in recurring tasks
If your recurring task has a comment with a checklist, its state upon the task’s renewal will depend on whether the comment is pinned or unpinned.
If the comment containing a checklist is unpinned, the progress of a checklist will stay unchanged with each renewal of that task. This means that if you check off some of the checklists' elements in the currently active version of the recurring task, then the checklist’s state will be preserved. The next renewal of that task will show the checklist in the same state you left it before completing the previous occurrence of that task.
However, if your comment containing a checklist is pinned, Nozbe will reset its progress with each renewal of your recurring task. The checklist will always be cleared in each new master task.
You can check the state of the checklist from a previous occurrence of the recurring task in the history task.
How can I edit a new task
Once you add a task, you can change its parameters:
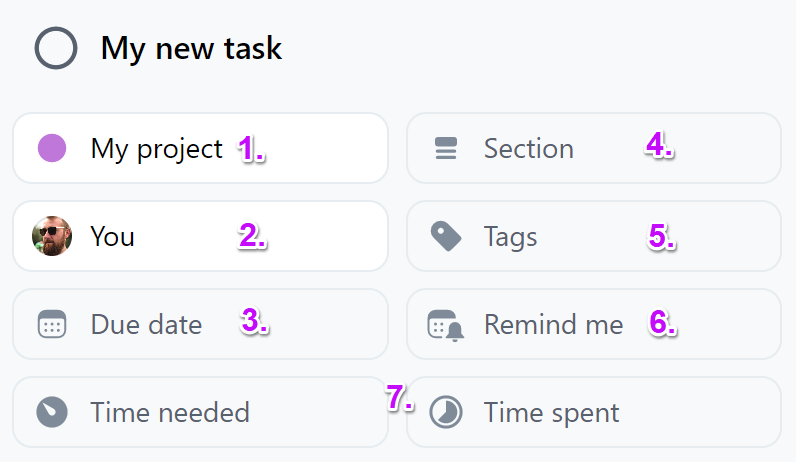
- Tap here to change the project this task belongs to.
- If you add a task in a shared project or move it to one, you can tap this button to assign the task to someone else.
- You can also set a due date for the task.
- If a project is divided into sections, you can assign your task to a section.
- Add a tag to the task.
- If you don’t want to forget about a task, set a reminder for it. You will then receive a notification about it.
- If you enable Time attributes in a project, you can also set the time needed and time spent parameters to your task.
If you tap on the attribute, you can use the search option (the magnifying glass icon). It will help you find a specific project, section, tag, or person.
Search is available for the following parameters:
- project list
- responsibility
- tag list
- section list
Multi-editing
If you want, you can work on several tasks at once. To select them, tap on the task list’s menu ("…" icon next to the view’s name) and choose “Select tasks”.
Choose the tasks you want to edit and tap the “Change” button at the bottom of the app. As you can see, you can change many different parameters here.
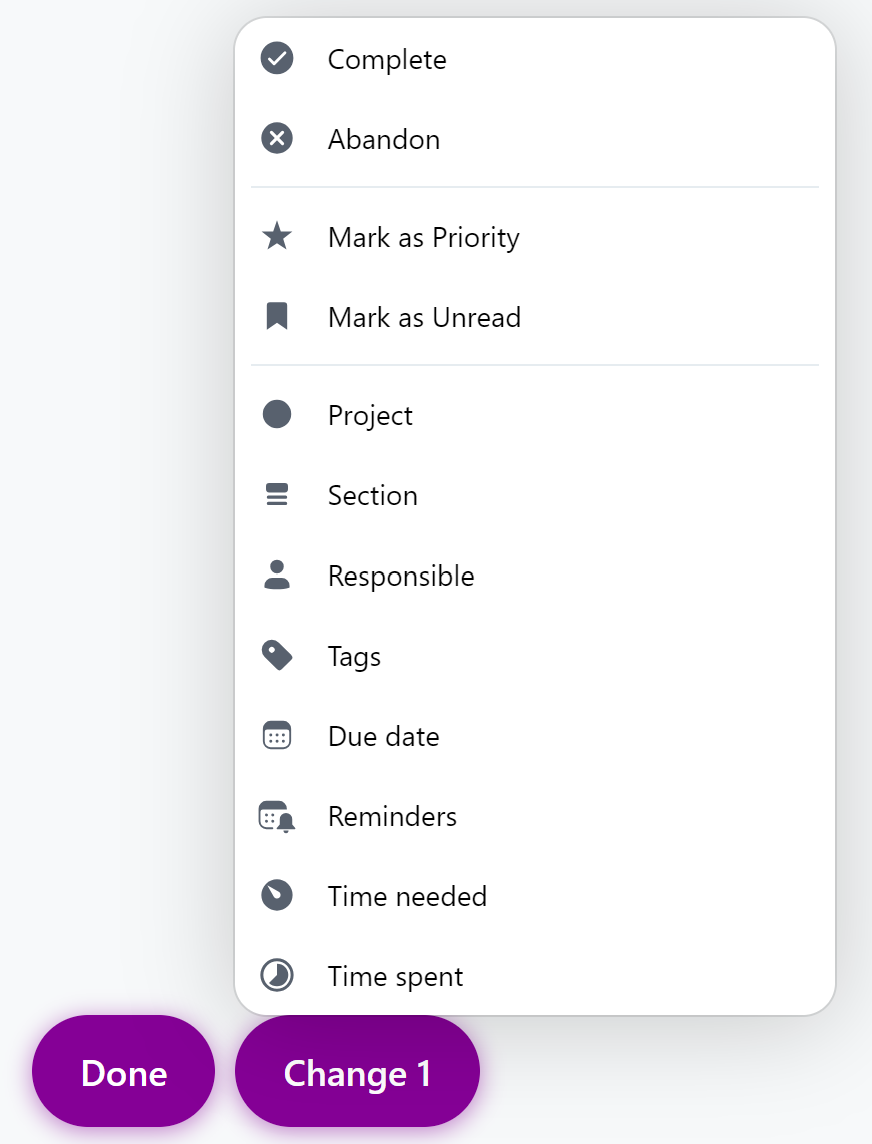
Once you are done editing, tap “Done” to save the changes.
The options displayed vary depending on which conditions are met:
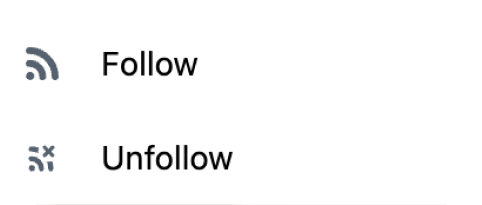
- If all selected tasks are being followed, we only see the “Unfollow” option
- If none of the selected tasks are being followed, we only see the “Follow” option
- If some are being tracked and some are not, we see both options
When you want to add text to task names, you can choose where you want to add it.
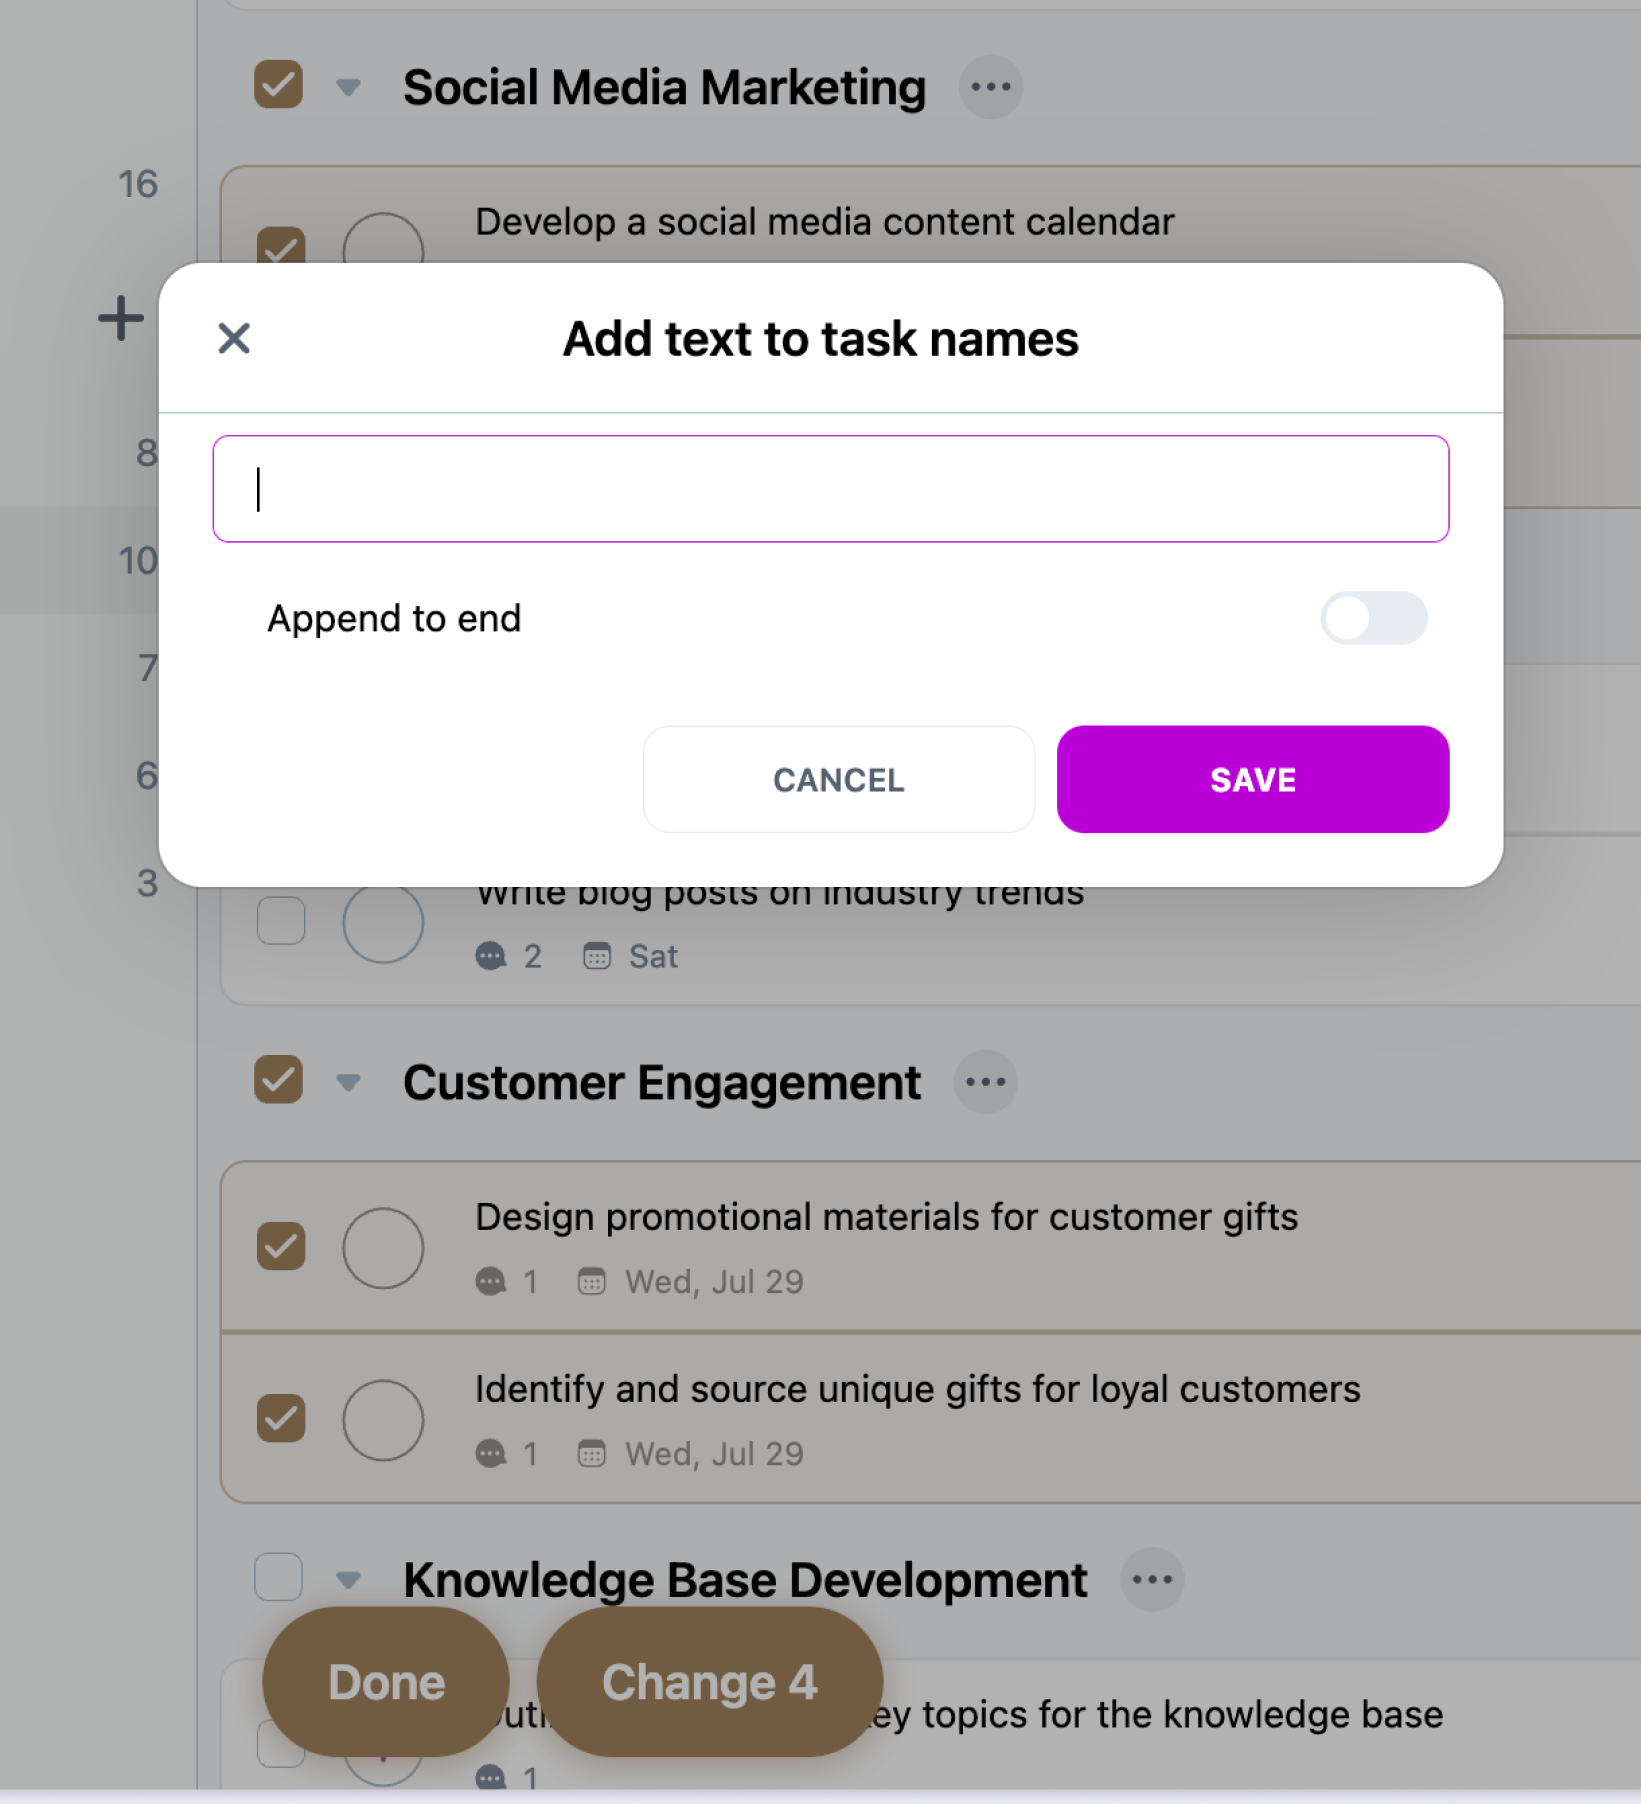
Pro-tip: You can also enter the multi-edit mode using shortcuts.
-
On macOS, you can use ⌘+click to select the first task and enter edit mode. Then you can click to toggle task selection. It is also possible to use ⌘+click and select a range with ⇧+click.
-
On Windows, you can select the first task with Ctrl+click to switch to the edit mode. Click on other tasks to select the ones you want to edit, or use Shift+click on the last task to select a range.
Icons on a task
When you start adding different parameters and interacting with your tasks, icons indicating those parameters will show up around its name on the task list.
- This icon represents the project to which the task belongs. A full circle means that the project is open to everyone, while a donut means that the task belongs to a limited access project. If there’s a lockpad next to it, it means that only you have access to that project.
- This icon shows you that this task belongs to a specific project section.
- The chat bubble icon tells you how many comments were added to this task.
- The calendar icon shows you what due date is set in that task.
- If you had set recurrence for your task, this icon will tell you how many times this task repeated since the last time you completed it. If it’s red and shows a number greater than 1, this means that you’ve skipped a few of its instances.
- The bell icon represents the reminders you’ve set for this task. If you set more than 1 reminder, the date of the closest one will be displayed next to the bell; you will also see the total number of other upcoming reminders you’ve set for this task as “+X”.
- The timer icon represents the time needed parameter.
- The time slice icon shows the time spent parameter set for this task.
- Here you will see icons of tags assigned to this task. They may have different icons and colors, depending on the tag settings.
- If your task showed up in Incoming, you can use the orange button to review it, making it disappear from your Incoming list. A colored star means that you’ve marked this task as your Priority.
- If there is new activity in the task, a blue dot will be displayed in the upper-right corner. It will disappear once you read these comments.
If you go to a different view, then you can distinguish tasks that are currently in Incoming - they will be bolded and have the Incoming icon displayed next to their name:
If you forget to complete a task with a due date in time, it will show up as overdue. This means that its due date will be written in red, and a flame icon will be displayed next to it:
If you are following a task from a project that you don’t follow, a blue signal icon will show up under its name:
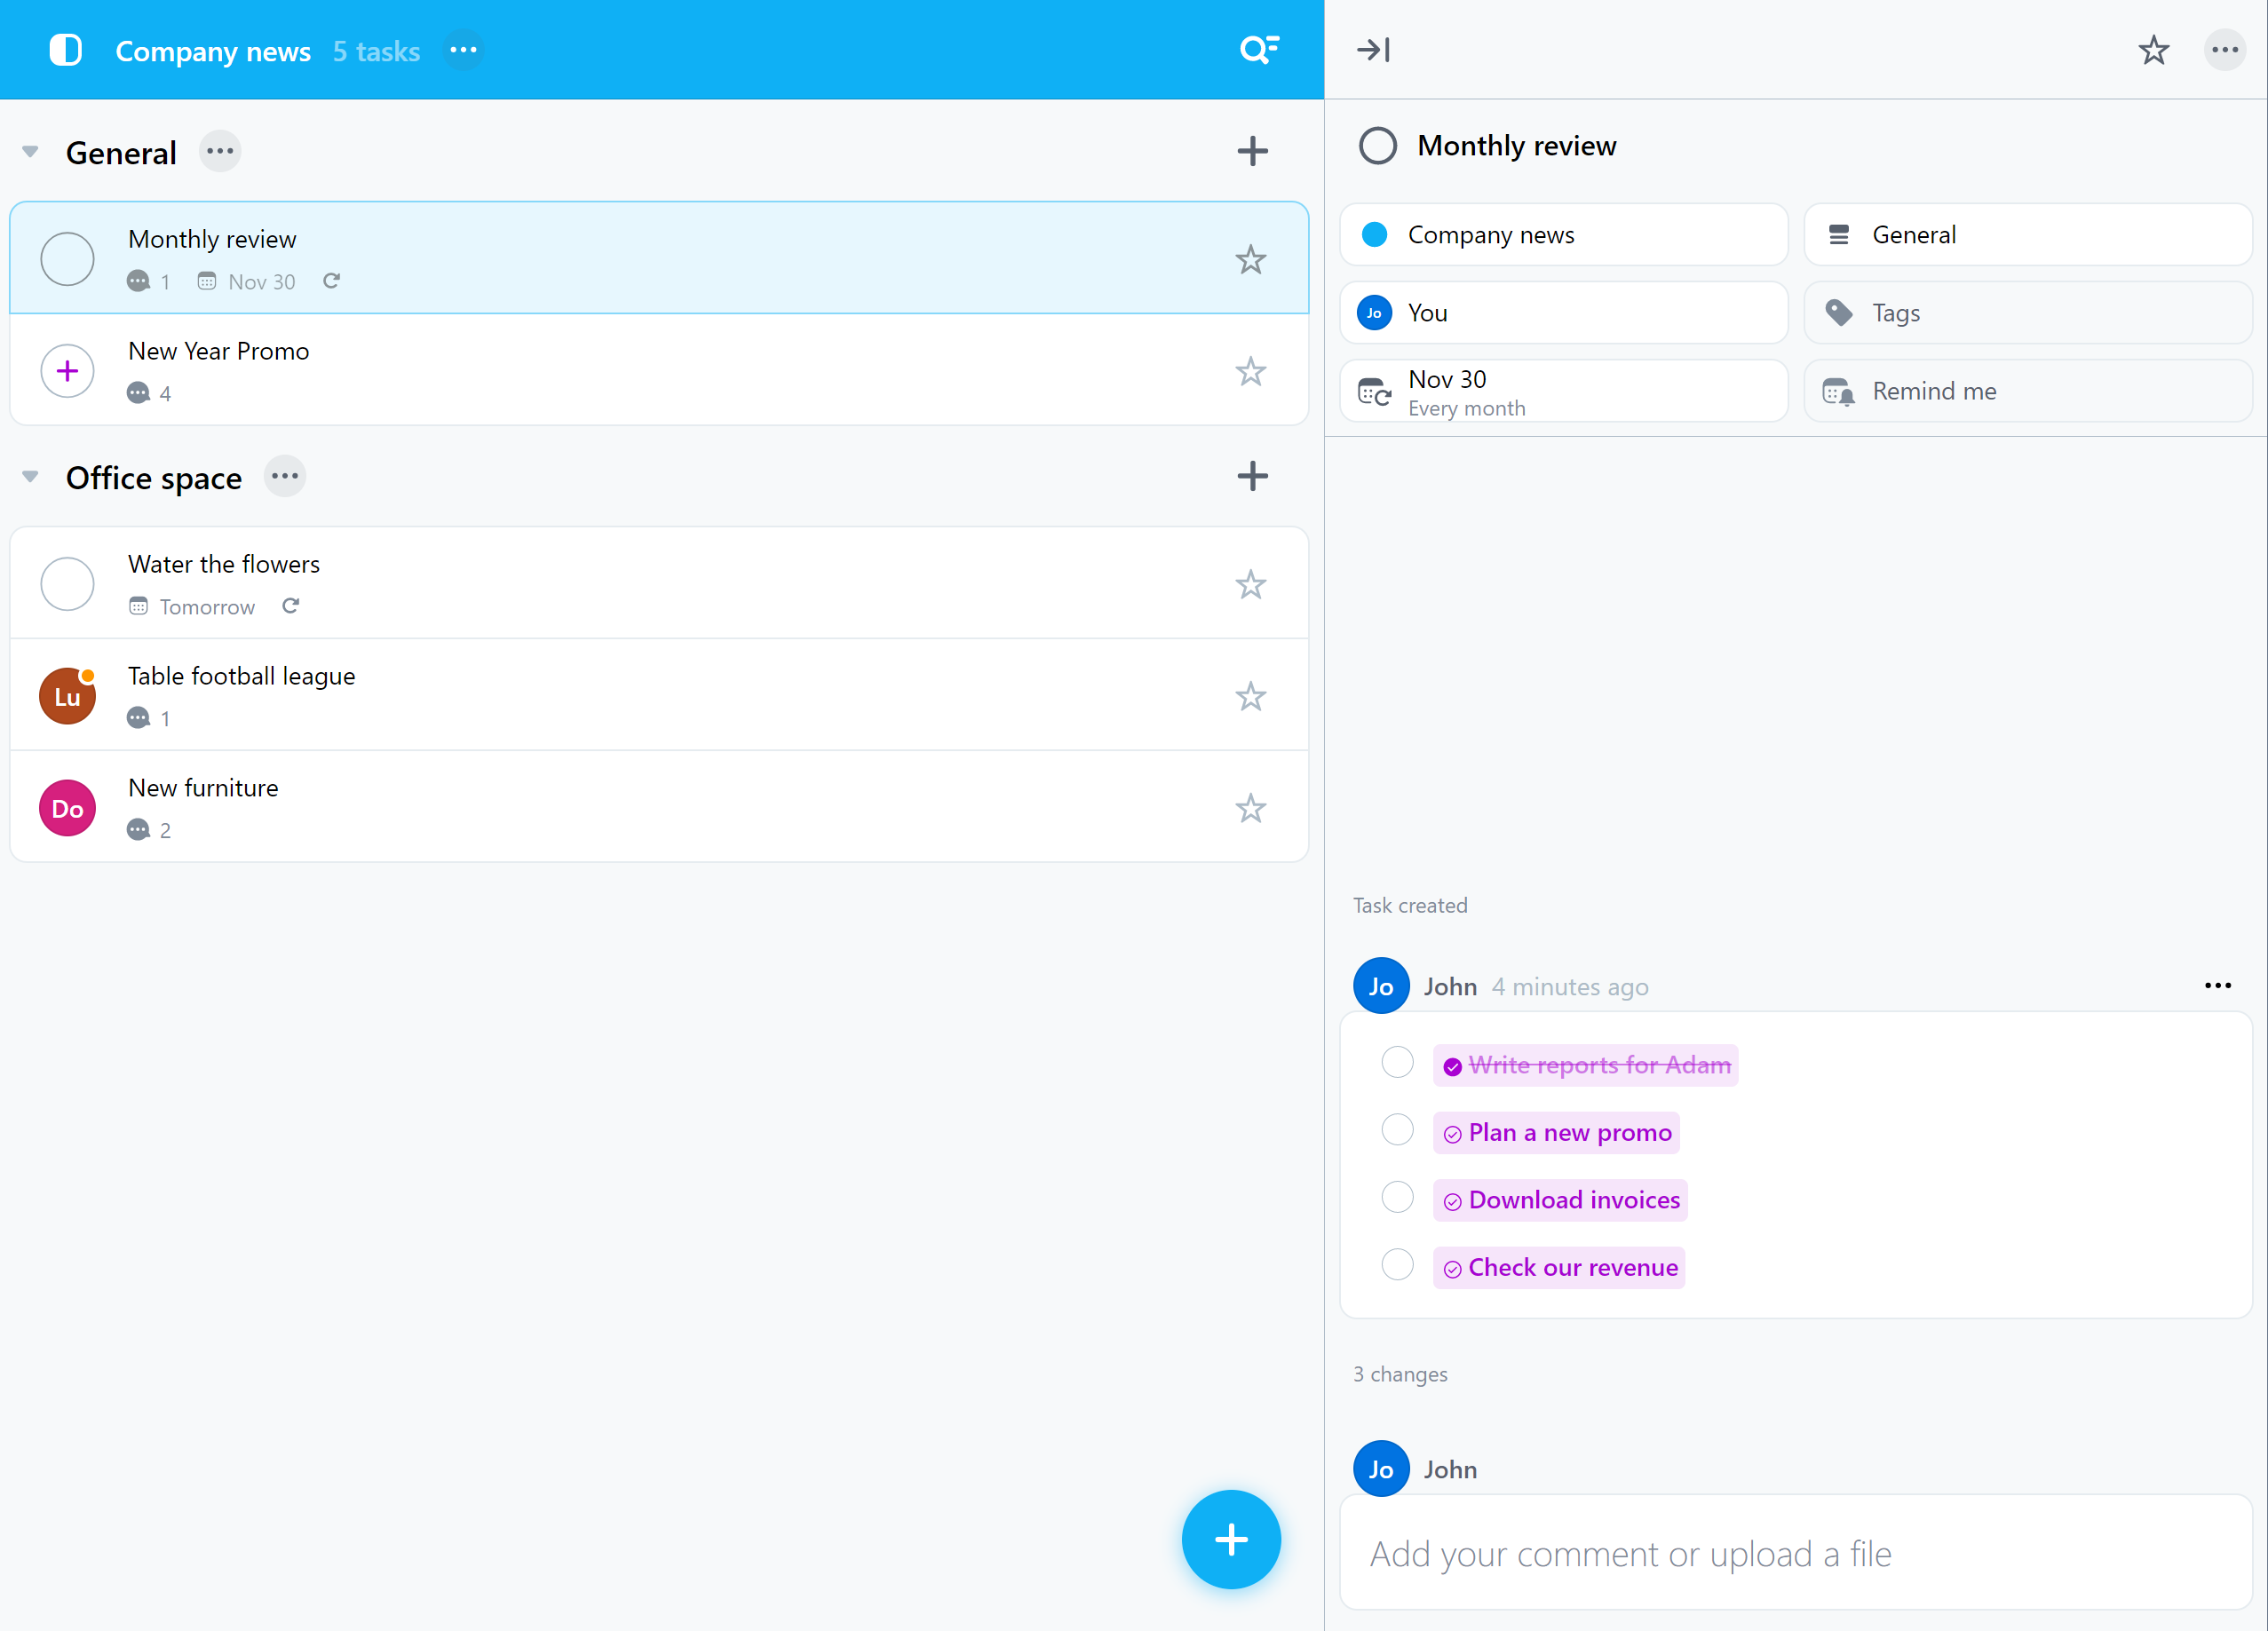
Inline activity
The inline activity is the information that shows up as grey text between the comments in a task. If a person makes a change in a task, it will be represented as a new inline activity.
To see more details about the changes made, tap on the inline activity. You will then see the name of a person that made the change, as well as when it was done.
In the inline activity, you will find information about:
- task being added, completed, restored, or abandoned
- responsibility being assigned, changed, or removed
- due date being set, changed, or removed
- recurrence being added, changed, or removed
- recurring task being renewed
- time needed or spent being set, changed, or removed
- task being renamed
- task being moved from one project to another
- task being assigned to a section or removed from it
- tags being added, changed, or removed from that task
- access to a task being granted, changed, or revoked
- comment editable by others being added or edited
If there are more than 2 changes made in a short time, the inline activity will be summarized as “X changes” (where “X” represents the number of grouped activities). Tap on that text to expand the list of activities.
Task’s menu
Open a task and tap on the “…” icon to view the task’s menu.
- mark the task as unread or reviewed
- go to the task’s project
- enable time attributes. This will enable the time needed and time spent parameters for each task in this project
- rename it
- abandon it
- delete it
- follow the task. You can use this option to follow tasks from projects you don’t follow. What’s more, if someone mentions you or assigns you a task from a project which you don’t follow, or if you add a task in a non-followed project, such task will also become a followed one.
- copy link to the task
- clone it
- add comments via email. If you tap on that option, you will see the task’s address. You can add comments by sending emails to that unique address.
- enter the fullscreen mode. If you want to focus on a single task without any distractions, tap on this option. It will show the task in fullscreen mode. To exit this mode, tap on the cross icon in the upper-left corner.
How to clone a task
If you want to clone a task, you need to open it, tap on the “…” icon, and select the “Clone” option.
Then you can choose the name for the copy and set additional parameters (specify a project, a section, or a responsible person). You can also decide whether you want the copy to contain all comments from the original task, or just the pinned comments.
Confirm your decision by tapping on the “Clone” button.
The first comment in the clone task will contain a link to the original task. This way, you will never lose the original.
Please note that when you clone a task, you will become its author. You will also be the author of all comments within it.
How to move a task to another space
In Nozbe you can move tasks between spaces.
Go to the task you want to move to another space.
- Click the three-dot icon “…” next to the task name.
- Choose: Move to another space.
- Select the destination space from the list.
- Select the project you want to move this task to; once no project is selected, it will be added to the Single Tasks in the selected space.
- Confirm the move. Once confirmed, this task will be relocated to the selected space.
Note: When you move a task to another space, some people may lose access to it if they are not members of the destination space. While you will still see who added comments to this task previously, those users will no longer have access to this task in the new space.
Once the task has been successfully moved to the selected space, a confirmation window will appear, and you’ll be automatically forwarded to that project and space.

How to convert a task into a project
If a task becomes too complex or requires running multiple steps, you can convert it to a project.
How the task is converted
When you convert a task into a project, Nozbe will create a new project with the same name as the original task.
In the project description, you will find a link to the original task you converted into that project.
All checklist items from the original task’s comments will be converted into separate tasks within the new project. Checklist items that were marked as done will be transferred to the new project as completed tasks.
Other content, such as files and text comments, will be aggregated in separate tasks in a “Project resources” section within that project.
If the original task belonged to a project you shared with other people, all tasks added to the new project will be assigned to “Anyone”.
If the original task belonged to your private project, the new project will also be marked as private. All checklist items that were converted to tasks will be assigned to you, while tasks from the “Project resources” section will be assigned to “Anyone”.
The original task will be marked as abandoned. You can restore it at any time within the original project.
How to complete a task
If you are done with a task, you can do a few things with it.
Complete a task
Once you finish working on a task, you can check off the circle to the left of its name.
Completed tasks get crossed out of the list. When you change the view, they go to the “Completed today” section located at the bottom of the list.
After 3 am, tasks will be archived, and they will disappear from your list. You’ll be able to review them any time by tapping the “…” button next to the view’s name and choosing the “Show all completed” option.
Abandon a task
What if a task isn’t completed, but you don’t need it anymore? You can abandon it. This way, you won’t see it on your list anymore. You don’t need to delete that task, because who knows - maybe you will want to access it again in the future. If you delete it, it won’t be possible.
Just open the task, tap on the “…” icon, and choose “Abandon a task.” Abandoned tasks get crossed out of the list, and when you change the view, they go to the “Abandoned today” section located at the bottom of the list.
Delete a task
You can delete it if you are 100% sure that you don’t need the task anymore. When you wish to delete one of your tasks, click on the “…” icon in the upper right corner and choose the “Delete” option.
That this change is irreversible, and you won’t be able to restore the deleted task.
To delete a task, you need to have space owner, admin or project manager rights. In projects in which you don’t have any privileges, you can delete your tasks within the first 5 minutes from the moment you added them.
Drag and drop
In Nozbe, you can drag pictures or screenshots and drop them in the comments to be added as attachments.
If you drag a file and drop it on the task list, you will add a task with this file attached.
This mechanism works only on the web and desktop versions.
ProTip: How to handle a chain of tasks in Nozbe
Sometimes, a task may rely on other tasks to be performed before it is marked as done. We will show you a neat trick that will help you handle such tasks chains using task links.
What is task dependency
Task dependency is the relationship between different tasks that requires us to perform them in a specific order. For example, you can’t send an offer to your customer if your co-worker hasn’t prepared it beforehand.
Using task links to create dependencies
You can point out the correspondence of different tasks by using task links in comments.
Task link is a unique hyperlink that allows you to access that task from anywhere. To copy the link to your task, click the “…” in the task details’ view and choose “Copy task link.” When you paste that link in a comment, it will be transformed into a hyperlink, showing the name of the linked task:
Also, when the hyperlinked task is completed, it will be displayed as crossed out in your comment:
Creating a chain of tasks
Thanks to task links in the comments, you can create a reference guide for a complex chain of tasks. This way, you can track work progress on your goals - even if they require multiple tasks from different projects to be performed in a specific order.
To start, add a task in which you will track the progress. Here, put all links to the related tasks in a comment - for example, in the form of a checklist:
Then, whenever you wish to check on the progress of work on your chain, open that task. All tasks that have been completed will be crossed out. Uncrossed tasks are what remains to be done.
In that task, you can also set up a reminder for yourself. It will help you remember to check what’s changed and how the work is going.
Want to let the person responsible for the next task know that they can start working on it? Click on the hyperlink to be moved to that task, and mention them in a comment.
Short Video: Why links to the tasks are useful


