Settings
General
Settings section
Every Nozbe user can customize their experience by adjusting their personal settings.
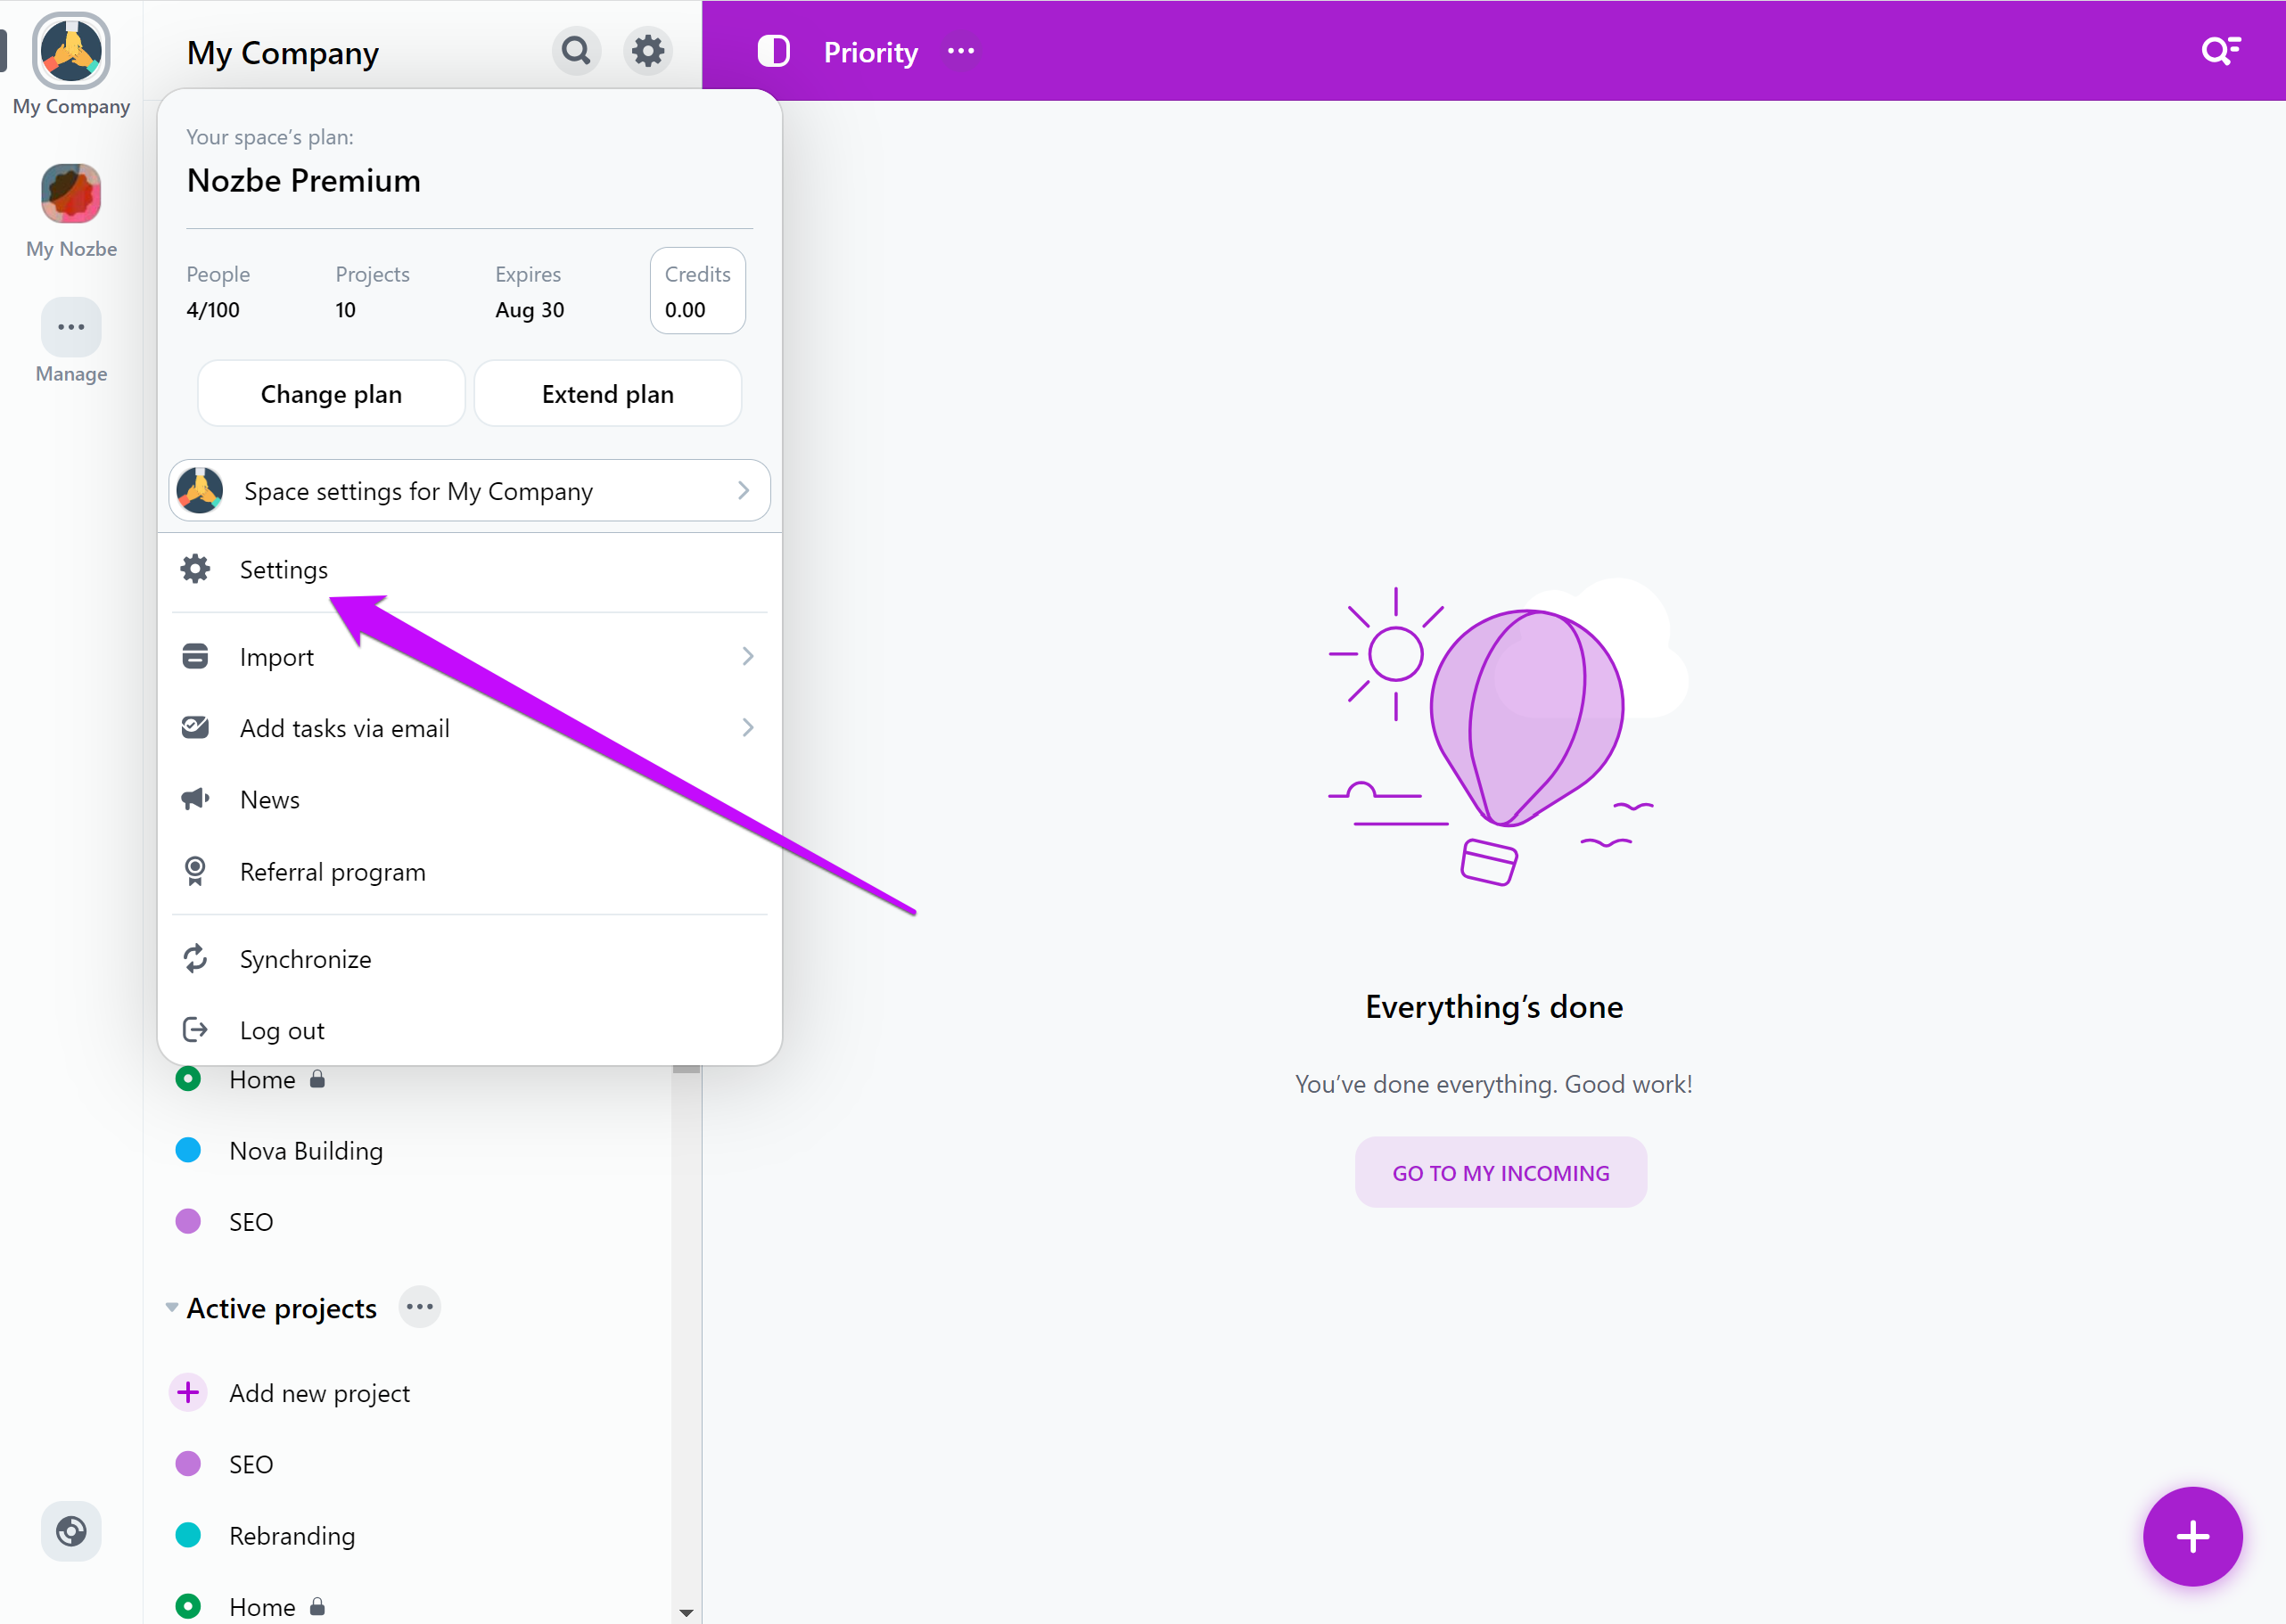
To access your settings, click the gear icon at the top of the left-hand panel.
From there, you can manage your preferences and make changes that suit your workflow.
Profile
In this section, you can check information about your Nozbe profile.
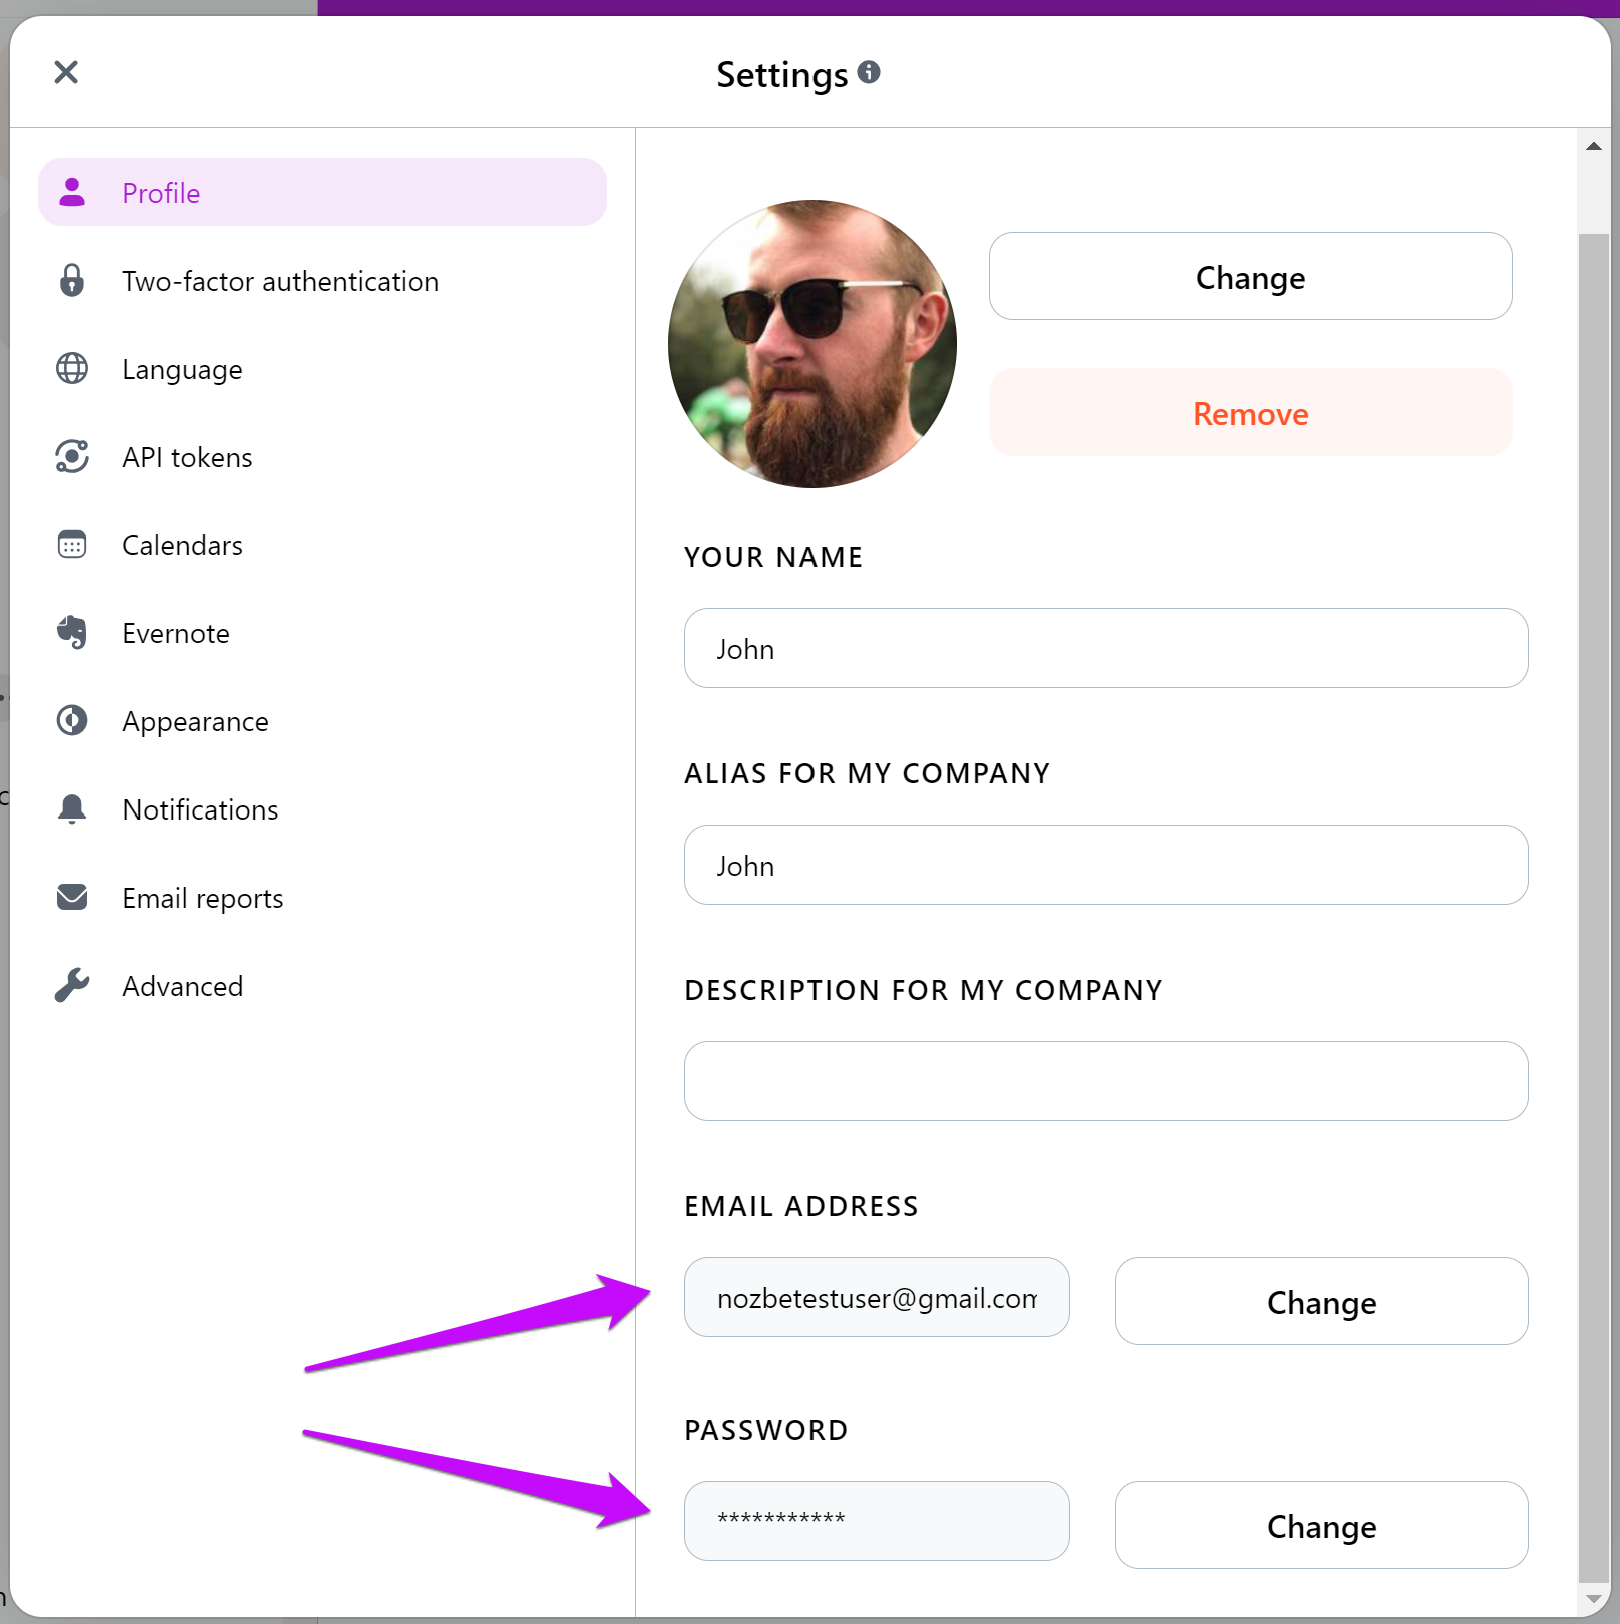
In your Settings panel, you can customize your profile to better reflect your identity within your Nozbe space. Here’s what you can change:
- Avatar Upload or change your profile picture. This image will be shown to other members of your space.
- Your Name This is the name you used when creating your account. To update it, simply tap on the current name and enter a new one.
- Alias Choose a short display name that will appear in your avatar and activity log.
- Description Add a brief description (up to 140 characters) to let others know more about you. This will be visible on your profile to other space members.
- Email Address View and update the email address linked to your Nozbe account.
- Password Set a new password for your account here.
- Contact Info Add optional contact details (e.g., phone number, external links). These will be visible to other members who view your profile.
Note: Changes to your name, alias, or description will be visible to all members of your space.
Change Your email address and password
You can change your email address and password in the Profile settings.
- To update the email address linked to your Nozbe account:
Enter your new email address in the first field. Repeat it in the second field to confirm. Type your current password in the third field. Tap “Save” to apply the changes.
- To set a new password for your account:
In the first field, enter your current password. If you’ve lost it, you can use a temporary password sent by Nozbe. In the next two fields, enter your new password and repeat it for confirmation. Tap “Save” to finish.
Contact info
You can add your email address, phone number, and other contact information in your profile settings so that others can reach you.
To do this, hit the “Add new contact info” button in your profile settings. Type in the information, select its type, and confirm.
Any contact information you add will appear on your profile, and other members of your space can view it in two ways:
- By clicking on your avatar anywhere in the app
- By tapping the “…” (more) button next to your name in the Space Members list
You can control the visibility of each contact item:
Use the “Show” toggle next to the contact detail to show or hide it from others in your space. This way, you decide what information is visible to your team.
Two-factor authentication
To help keep your account secure, you can enable Two-Factor Authentication (2FA). This adds an extra layer of protection by requiring a second step when logging in — in addition to your password.
How to set it up Go to Settings and tap on Two-Factor Authentication. Follow the on-screen instructions to learn more about how 2FA works. Choose your preferred method: Authentication app (e.g., Google Authenticator, Authy) SMS code sent to your mobile phone (available only to Premium and Business users)
Once activated, you’ll need both your password and a verification code to access your Nozbe account.
Language
When you go to the “Language” section of your settings, you can change Nozbe’s language to one currently available. You can also choose the “System Language” option. It will set the app’s language to match the device’s system (if it’s available). If it’s not, the language will be set to English.
Date & Time Format in Nozbe
Date and time format in Nozbe is now determined by your device’s region settings rather than just the language. 24-hour vs. 12-hour Clock To use the 24-hour clock, set your device’s region to one that uses it by default, such as United Kingdom or most European countries. If your device’s region is set to United States, Nozbe will use the 12-hour clock (AM/PM format).
First Day of the Week
Regions like the UK, Germany, and most of Europe start the week on Monday. United States and similar regions start the week on Sunday.
How to Change It
Go to your device’s settings and change the region (not just the language). This will automatically update the time format and week start day in Nozbe.
Note: Any changes to your device’s region will apply system-wide and affect all apps using regional settings, including Nozbe.
Notifications
You can decide what kind of notifications you wish to receive from your space.
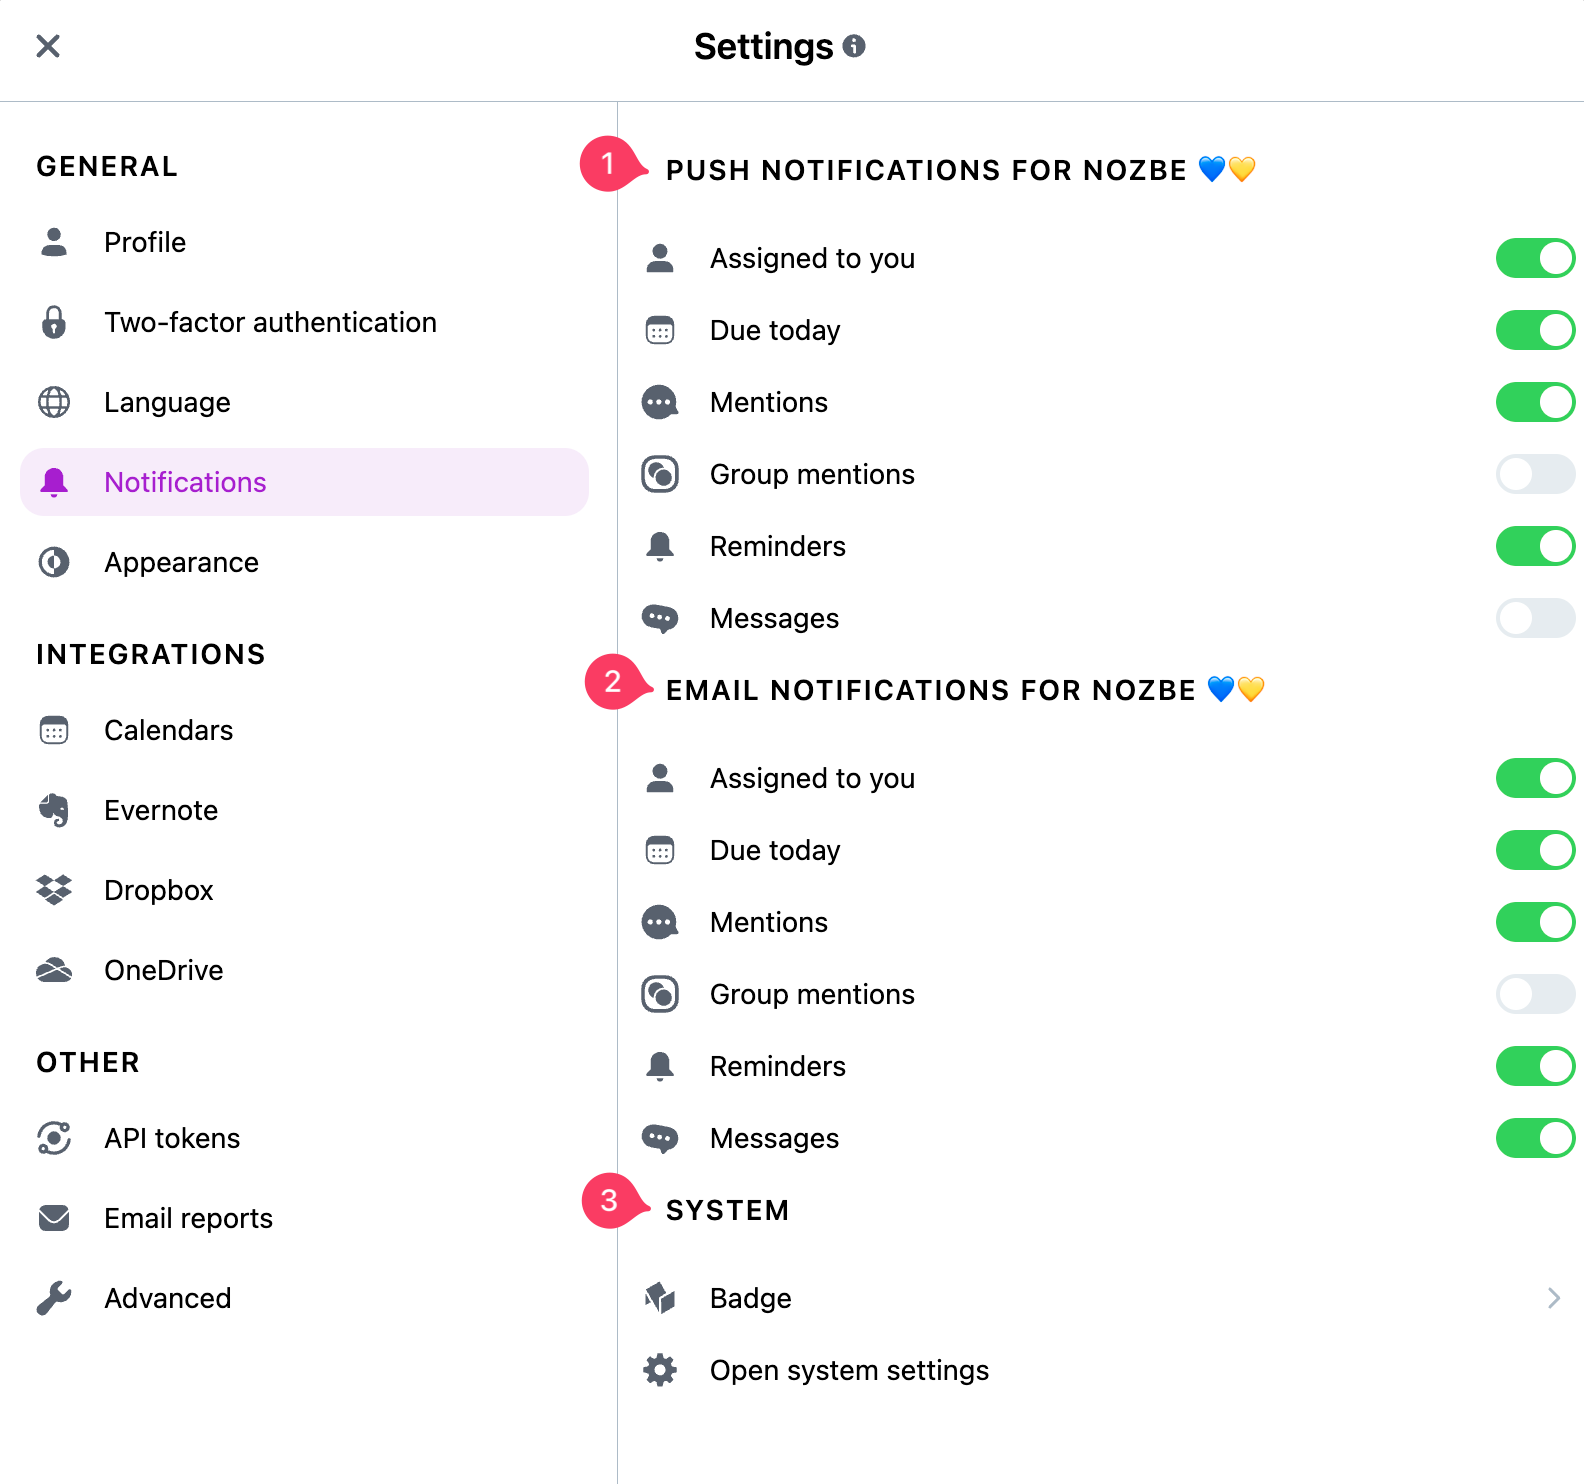
- Push notifications - notifications on your mobile device about activity in projects, as well as reminders and due dates.
- Email notifications - you can also choose to receive notifications via email about due dates, mentions, or reminders.
- System - to activate badges or to open the system settings on your device.
If you’re using the Nozbe desktop or mobile app (iOS), you can enable the badge app icon — a small number displayed on the app icon that serves as a quick visual reminder of pending tasks.
You can customize what the badge shows:
Tasks from the Incoming, Activity, or Priority views Tasks from a specific space or from all spaces in your account
To adjust these settings, go to Settings > Notifications in the app.
Vacation mode
Vacation mode - how does it work?
Vacation mode in Nozbe allows you to inform your colleagues that you are away from work and will not be available for a certain period of time. It’s a simple tool that helps avoid misunderstandings and improves team collaboration.
You can scedule more than one vacation, for your summer vacation, business leave and two days absence.
What happens when you enable vacation mode?
- Your notifications will be paused until your return date.
- Co-workers will see the information that you are on leave until {date}:
- When they want to assign you a task,
- Mention you in a comment,
- Or check your profile.
You will not receive any reminders or push notifications while you are on leave. You will also not receive email reports.
You need to set a vacation separately in each of your spaces. If you are on the Business plan, you can apply it to all spaces in the organization.
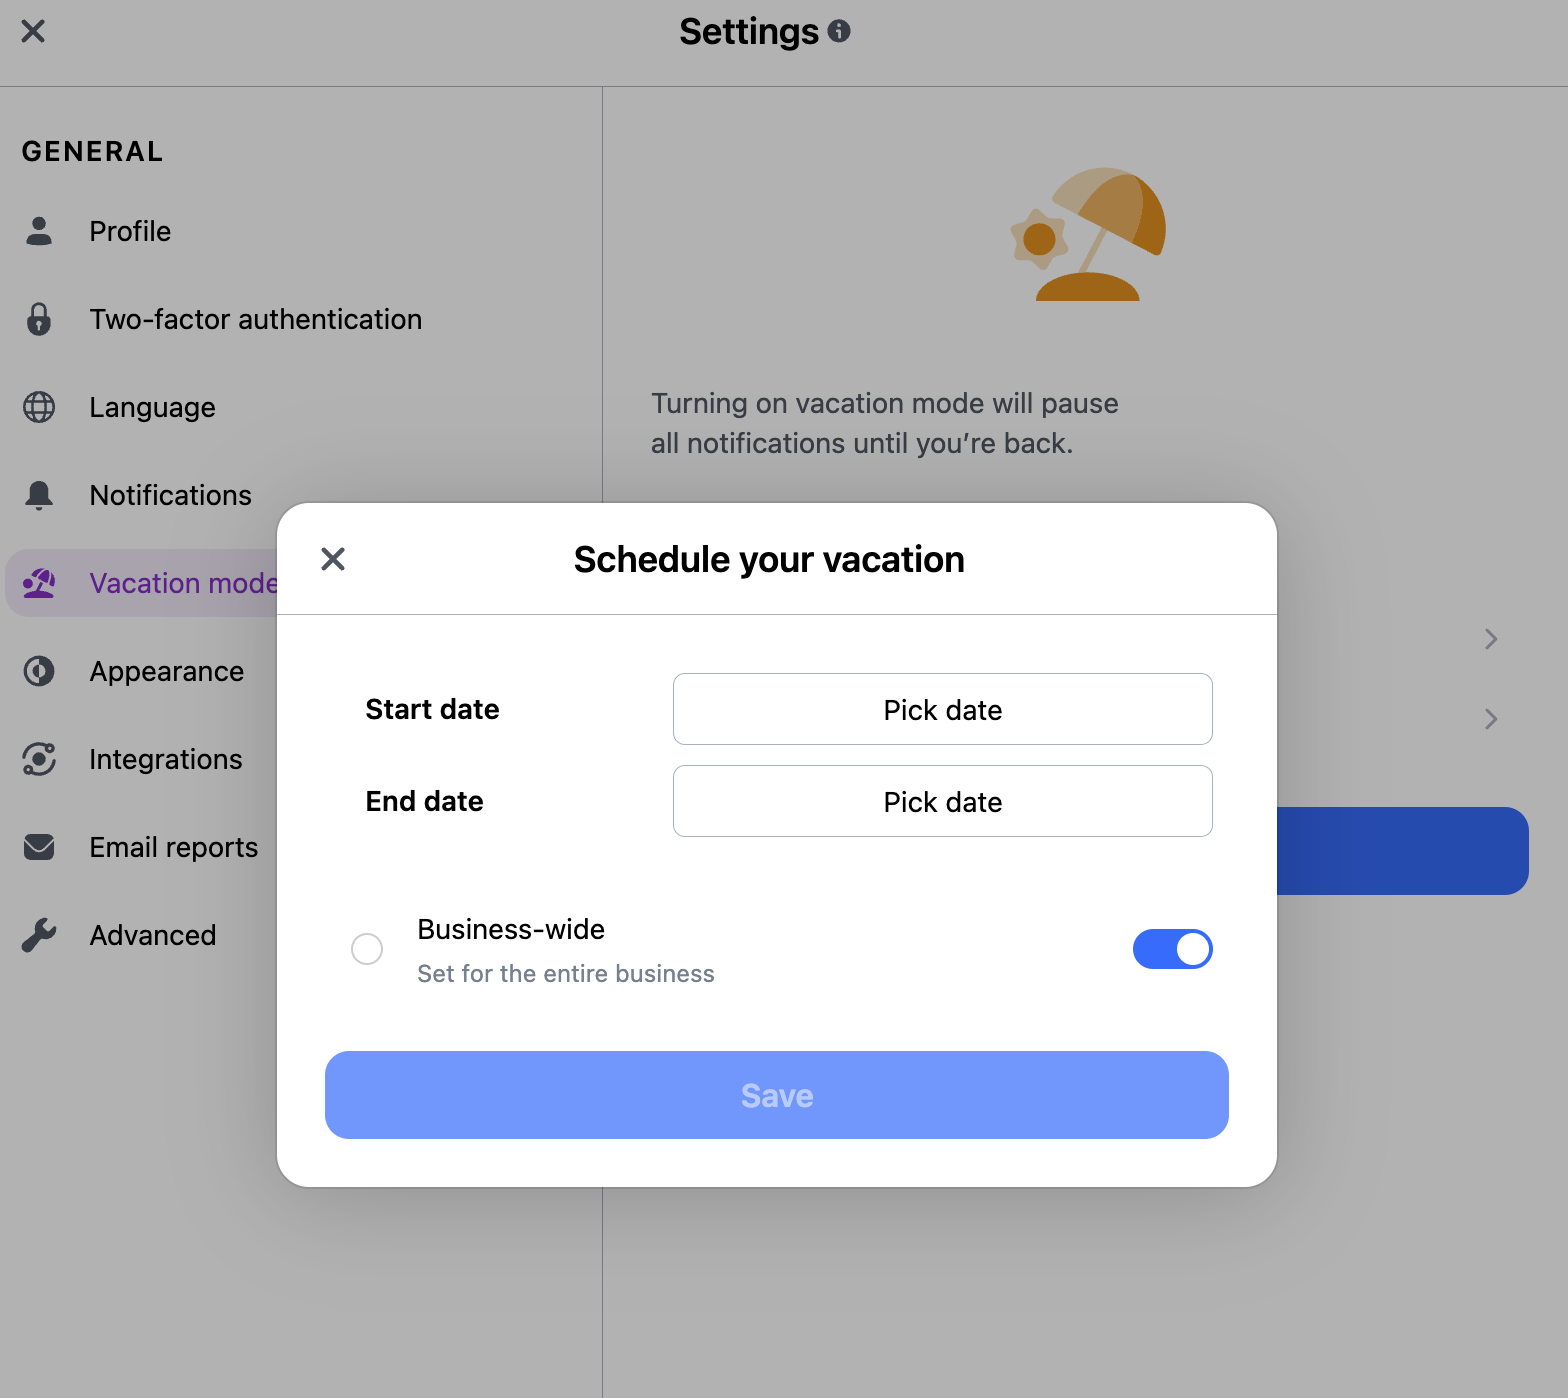
How do I set a vacation?
- Click on “Plan your vacation” in this view.
- Enter the start and end dates.
- Save – done!
Alternatively, you can also set your vacation in the team view of your Nozbe account
Appearance
In the Appearance section of your settings, you can personalize how the Nozbe app looks and behaves.
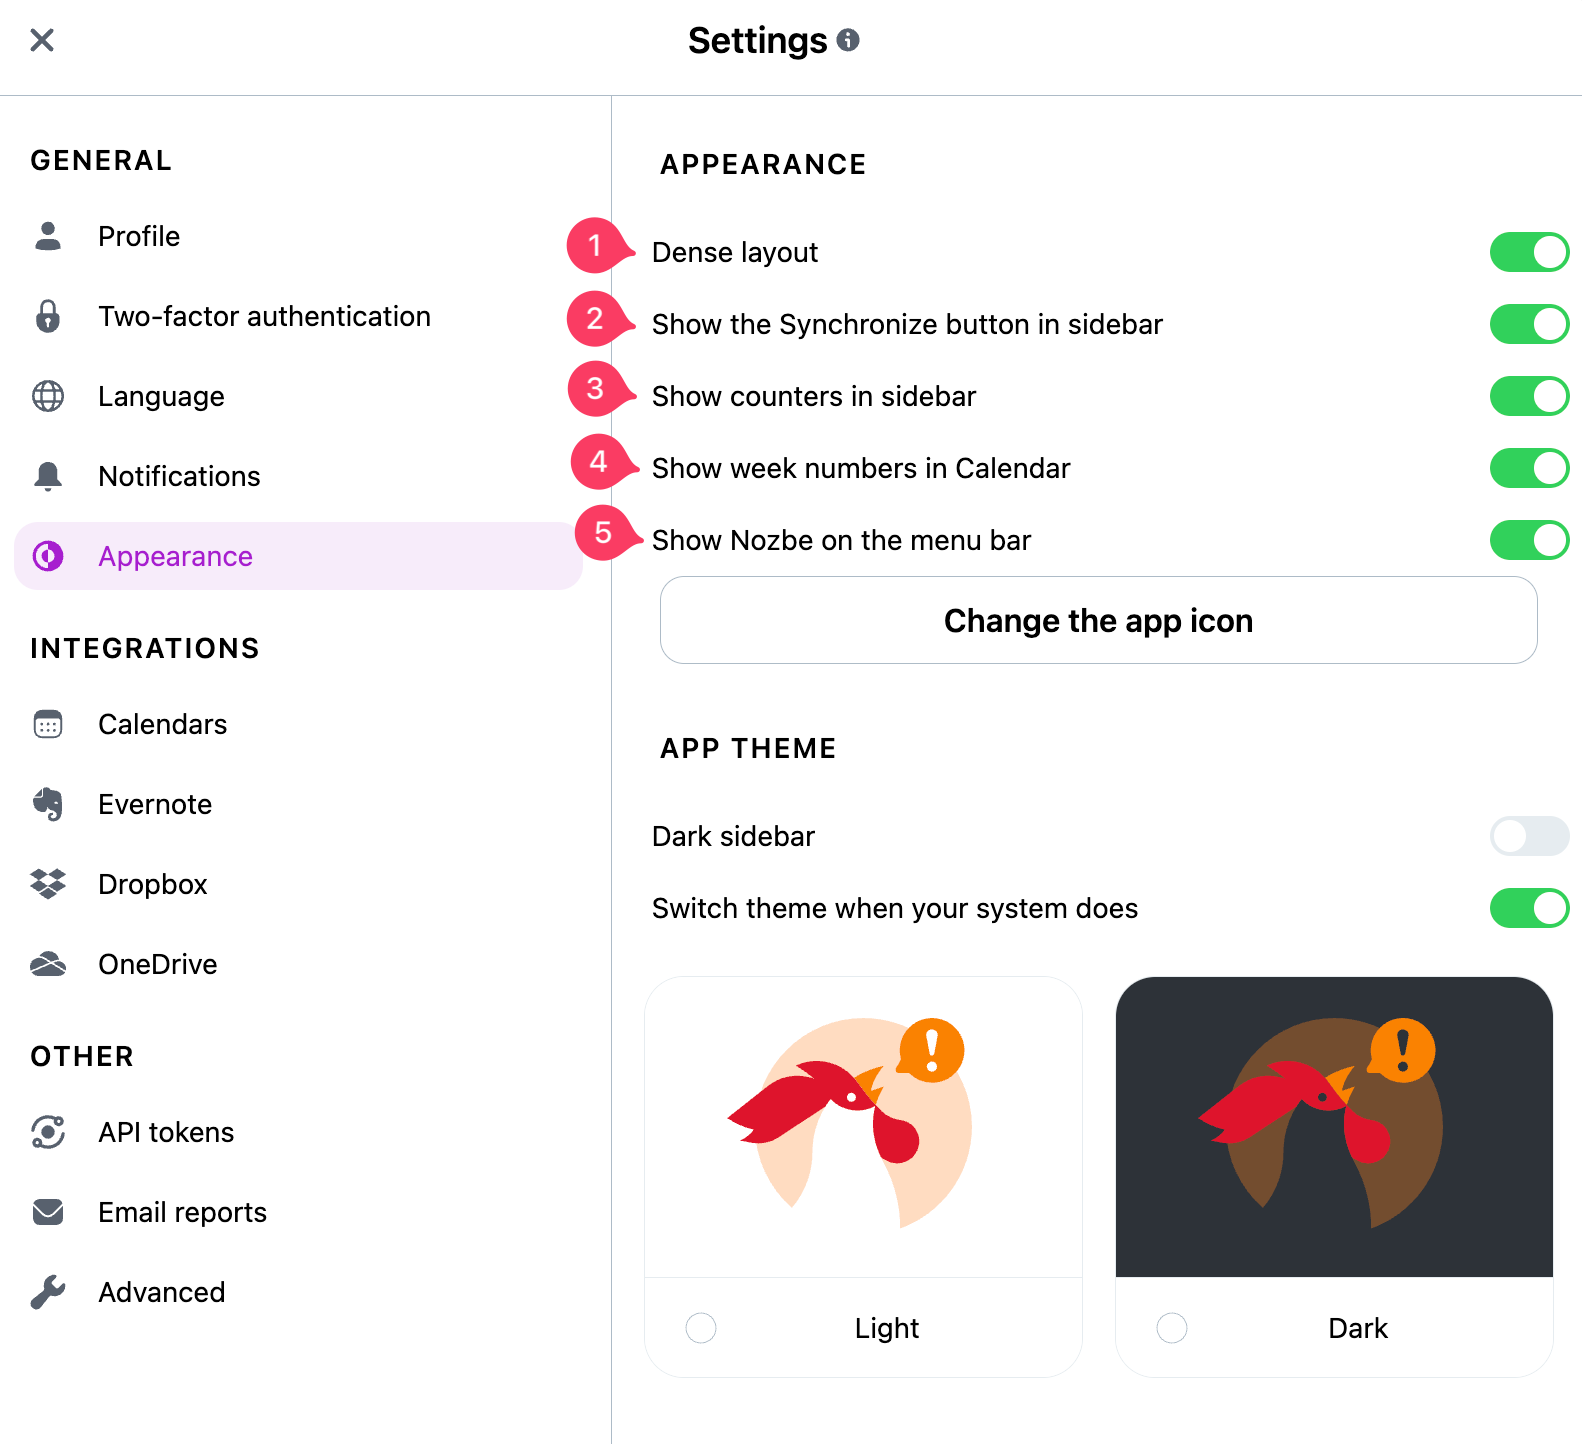
Here are the available options:
-
Dense layout - enabling this option will make the task lists and the sidebar more compact — perfect if you prefer to see more content on the screen at once.
-
Show the Synchronize button in Sidebar - turn this on to display the “Synchronize” button in the bottom-left corner of the app (available on web and desktop versions only). It allows you to manually trigger a sync.
-
Show Counters in Sidebar - when enabled, Nozbe will display counters for:
- Active tasks in each project
- Number of tags
- Number of space members
- Project groups and templates
These counters appear directly in the sidebar for quick reference.
-
Show Week Numbers in Calendar Enable this option to see the week number on the left side of the monthly view in your Nozbe calendar — helpful for planning and reporting.
-
Show Nozbe in the Menu Bar - enable this option to display the Nozbe icon in your computer’s menu bar (macOS or system tray on Windows). It gives you quick access to the app while it runs in the background.
Change the app icon
You can change change here your Nozbe app icon. To do this hit on “Change the app icon” button.
Simply select your preferred icon from the available options in this list.
✨ The new icon will be applied immediately across your devices (where supported).
App Theme
You can customize the look of Nozbe by selecting one of the following theme options:
- Dark sidebar If your app is set to light mode, you can turn on the Dark sidebar option to give just the sidebar a dark appearance.
- Switch the theme when your system does Choose this to have Nozbe automatically change between light and dark themes based on your device’s system settings.
Light - Set the app to use the light theme at all times. Dark - Set the app to use the dark theme at all times.
On mobile apps, the theme is automatically synced with your device’s system theme and cannot be changed independently within the app.
Integrations
In this section, you can integrate your Nozbe app with other services, select one of the integrations or set your own one using the Zapier app.
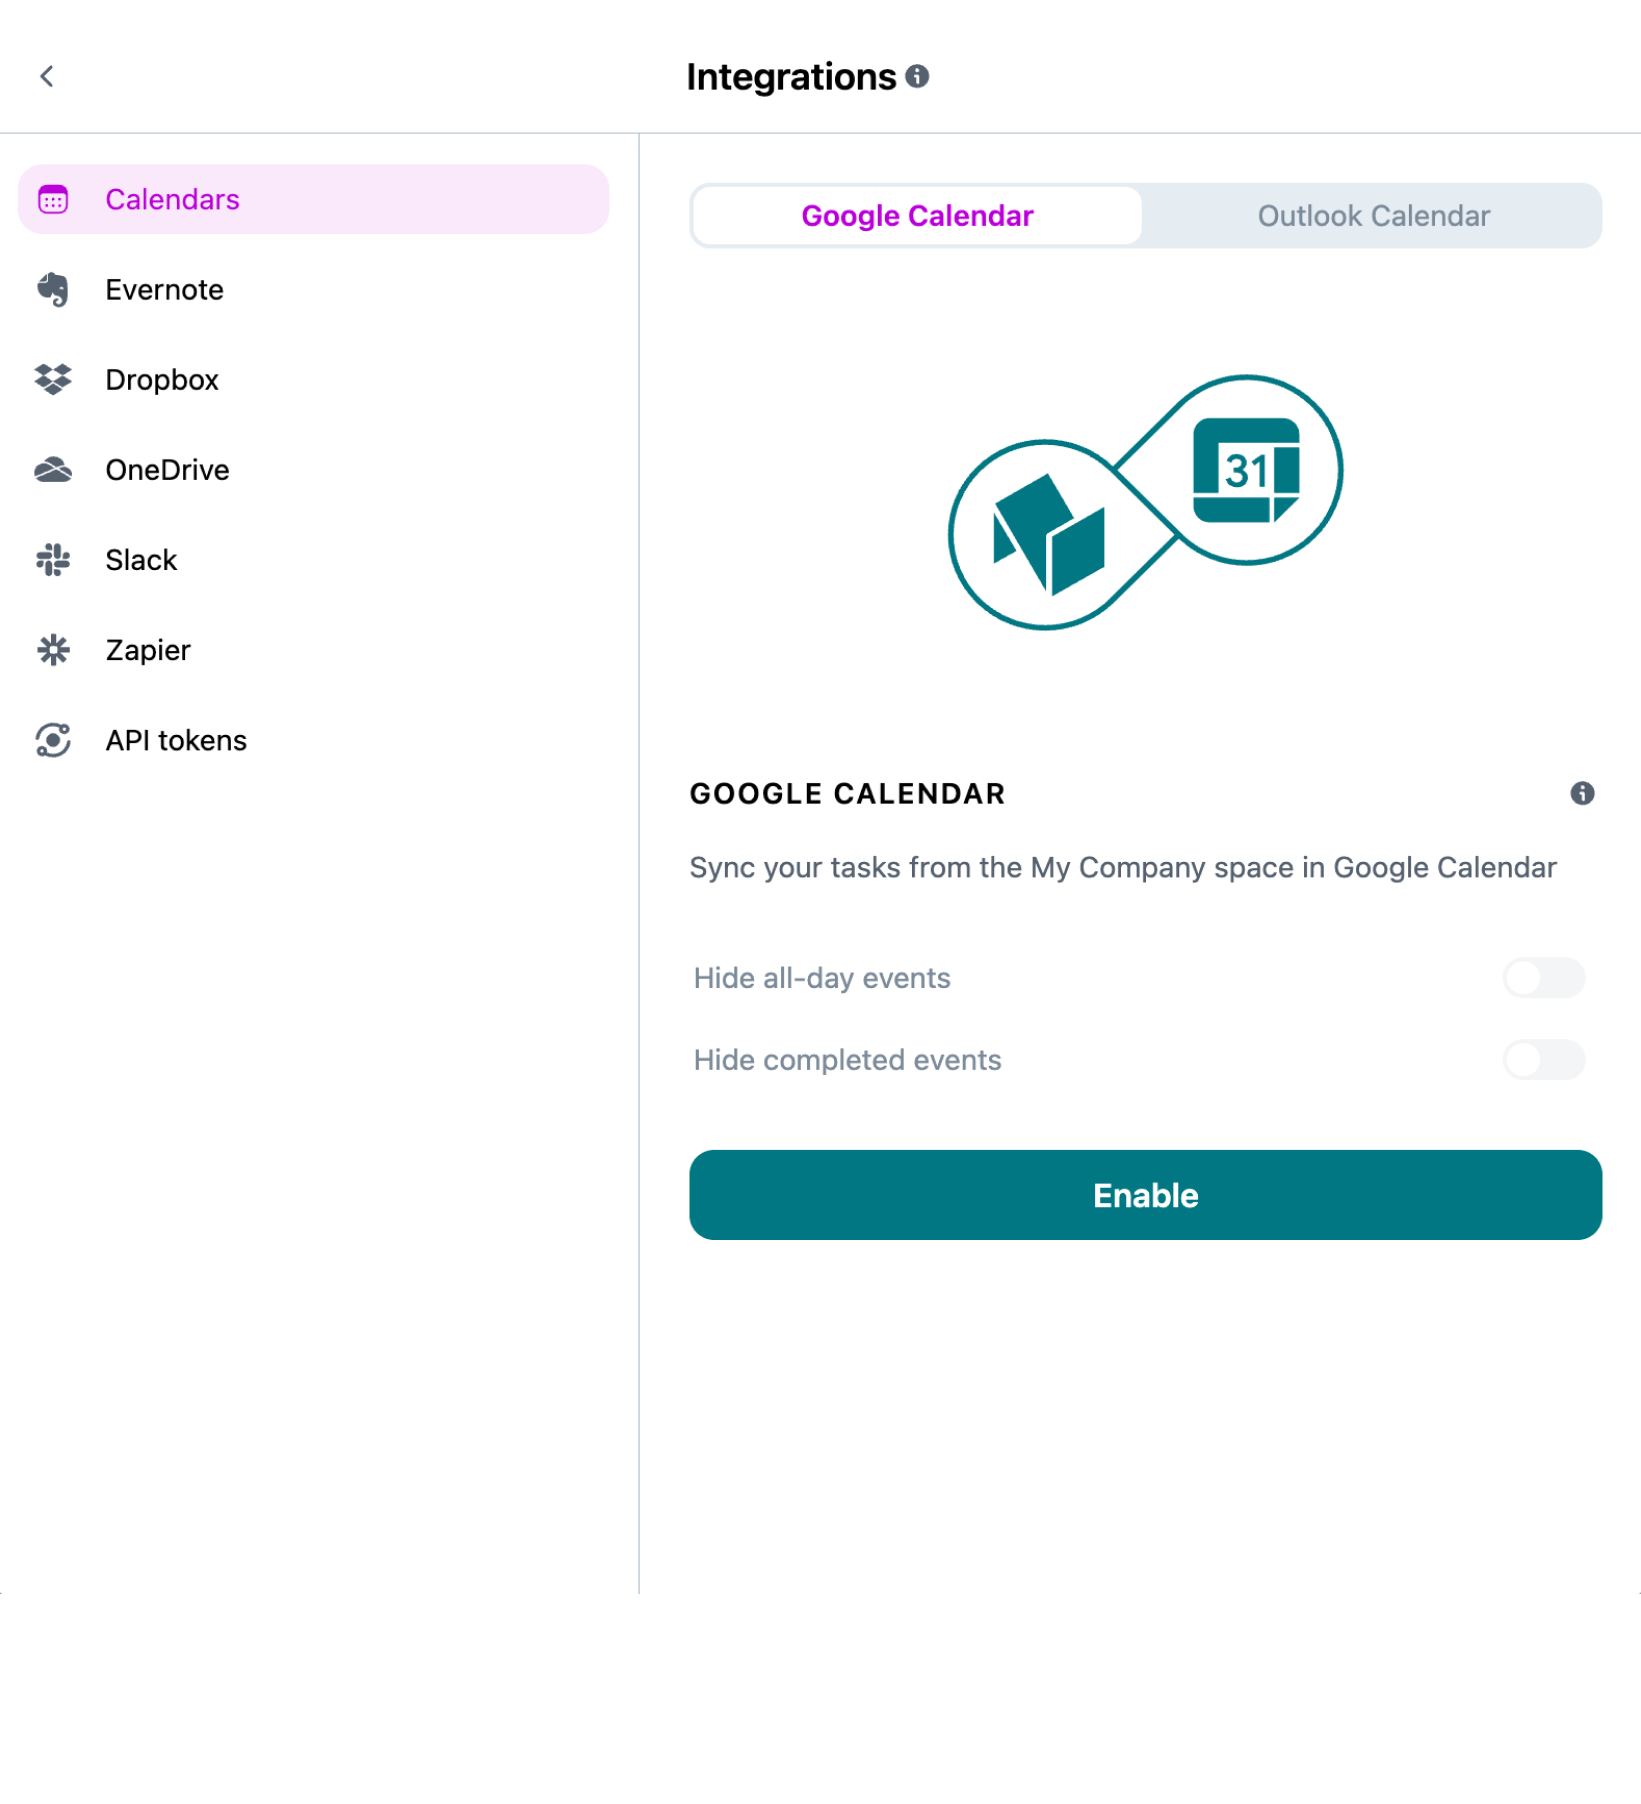
Calendars
In this section, you can enable the integration with Google Calendar and the integration with Outlook Calendar.
Choose the calendar that you’d like to integrate and tap on the “Enable” button, sign in and confirm Nozbe’s access to your Google or Microsoft account. When you do it, your integration will be ready.
Evernote
You can integrate Nozbe with Evernote to enhance your productivity.
To enable the integration:
Click the Add integration button. Log in to your Evernote account. Authorize Nozbe to access your Evernote data. Once connected, you’ll be able to attach Evernote notes to your tasks and see Evernote reminders directly in Nozbe.
Dropbox
You can integrate Nozbe with Dropbox to easily manage your files.
To enable the integration:
Click the Add integration button. Log in to your Dropbox account. Authorize Nozbe to access your Dropbox files. After setup, you’ll be able to attach Dropbox files to your tasks in Nozbe.
OneDrive
You can integrate Nozbe with OneDrive to streamline file management.
To enable the integration:
Click the Add integration button. Log in to your OneDrive account. Authorize Nozbe to access your OneDrive files. Once connected, you’ll be able to attach OneDrive files to your tasks in Nozbe.
Slack
You can connect Slack with Noybe to turn messages into tasks, preview them, add reminders, and get notified when you´re mentioned or assigned a task - all without leaving Slack
To enable the integration:
Click the Enable integration button. Sign in the Slack workspace you want to integrate with Nozbe Authorize Slack to connect with your Nozbe account. Once done, you´ll get notified.
Zapier
Integrate your Nozbe account with Zapier to automate Nozbe with hundereds of apps. Create Zaps thet turn events in one app into actions in Nozbe. Click the learn more button, to get more information.
API tokens
In this section, you can generate your API tokens which you can use to integrate Nozbe with other services, e.g. Zapier.
Email reports
You can receive email reports that summarize your personal and your space’s activity, statistics, and productivity. Once enabled, these reports will be sent periodically to your registered email address.
Available email reports:
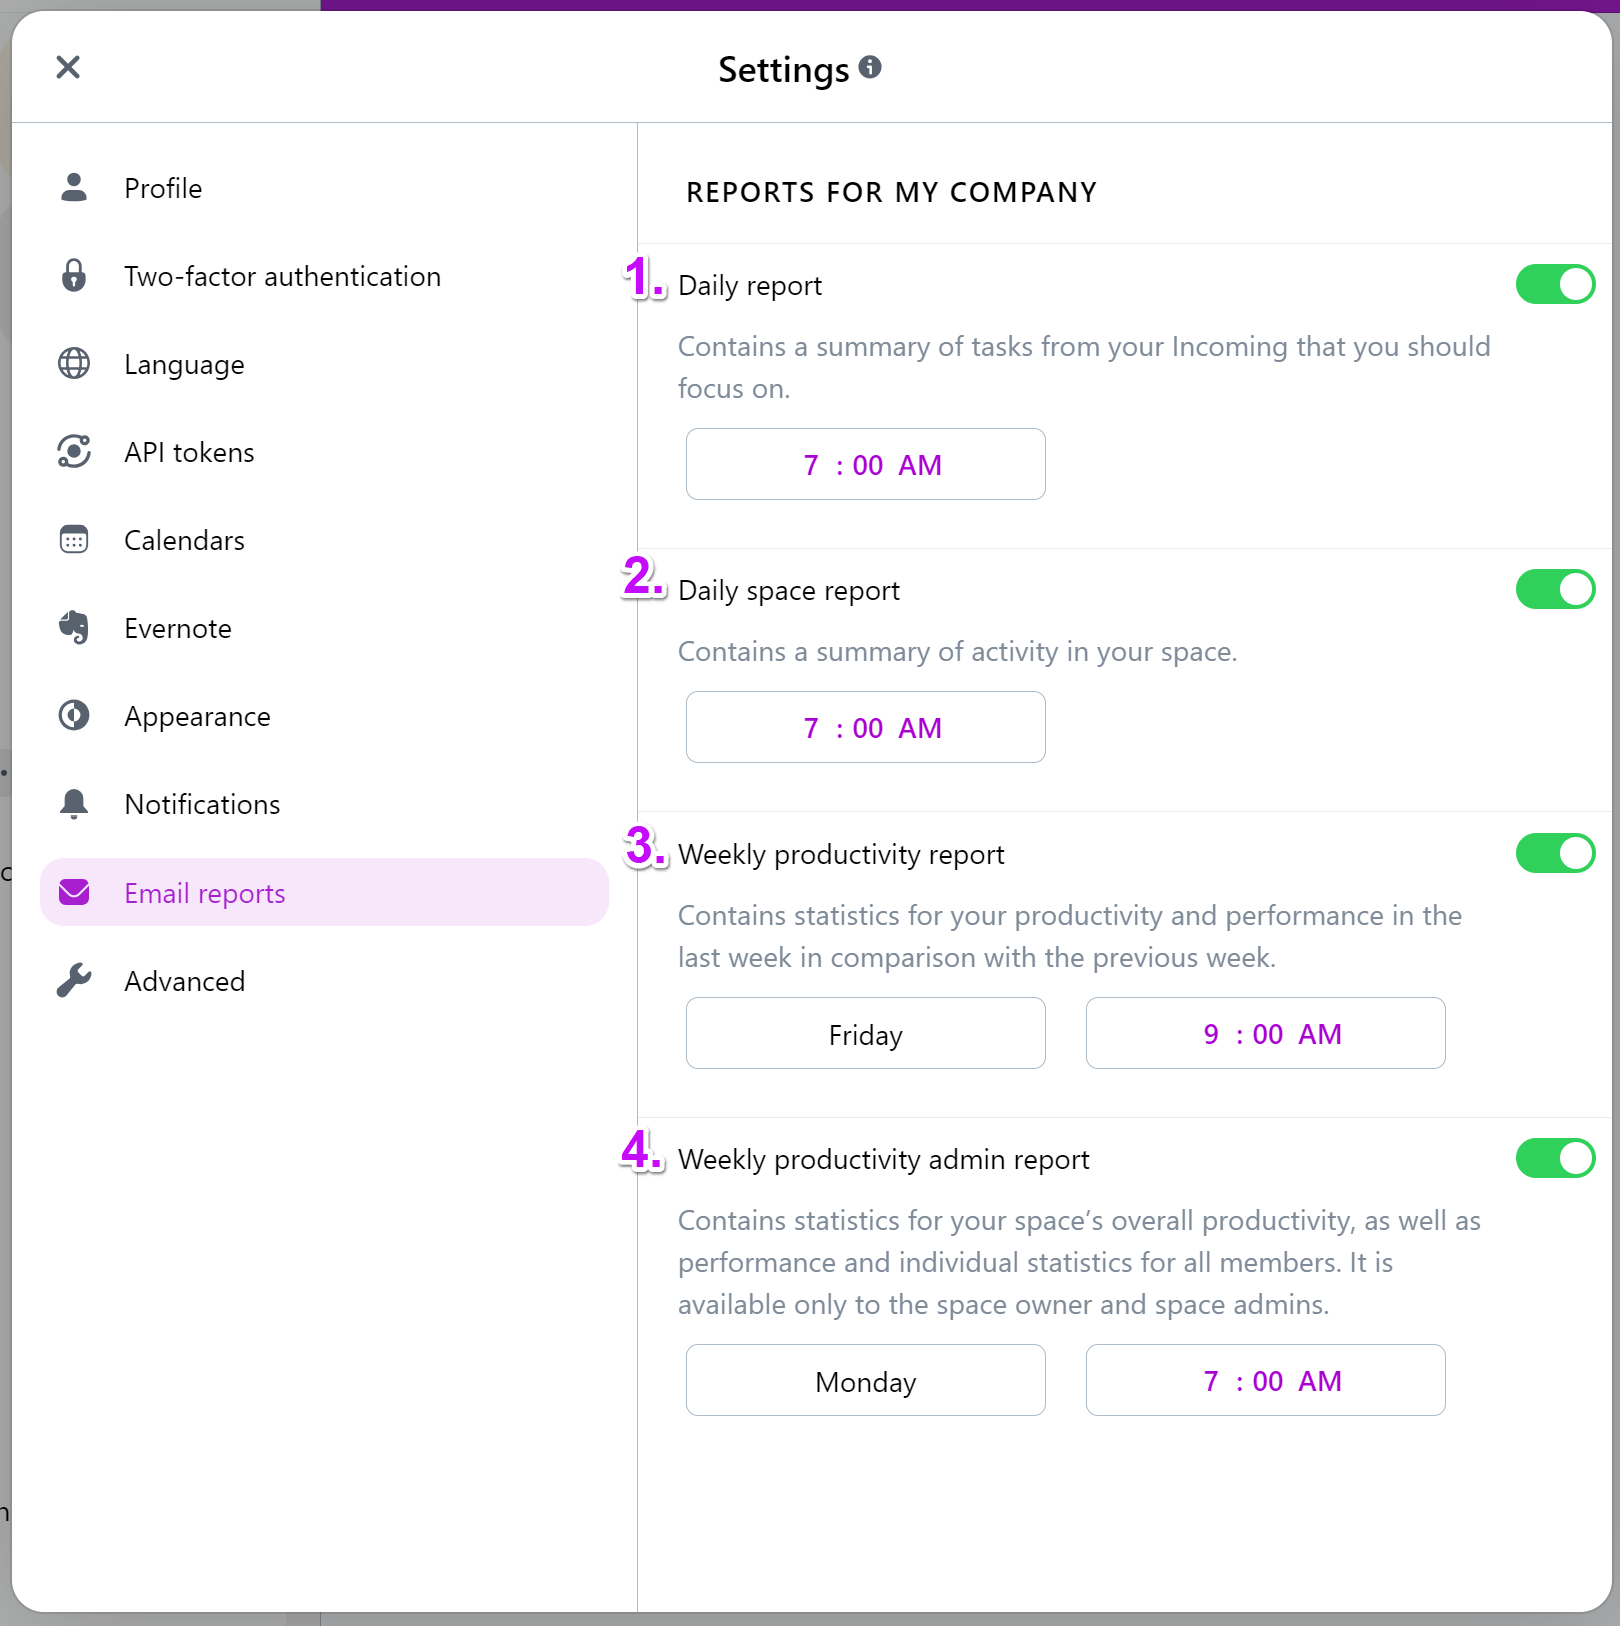
- Daily report - A summary of tasks from your Incoming that you should focus on.
- Daily space report - A summary of activity within your space — what happened during the day.
- Weekly productivity report - Statistics on your productivity and performance over the past week compared to the previous week.
- Weekly productivity admin report - Detailed statistics on the overall productivity of your space, including individual performance for all members. Note: This report is available only to space owners and admins.
You can choose the specific time when you’d like to receive these reports.
If you are a member of multiple spaces, you can configure which reports you want to receive for each space separately in their respective Settings.
Advanced
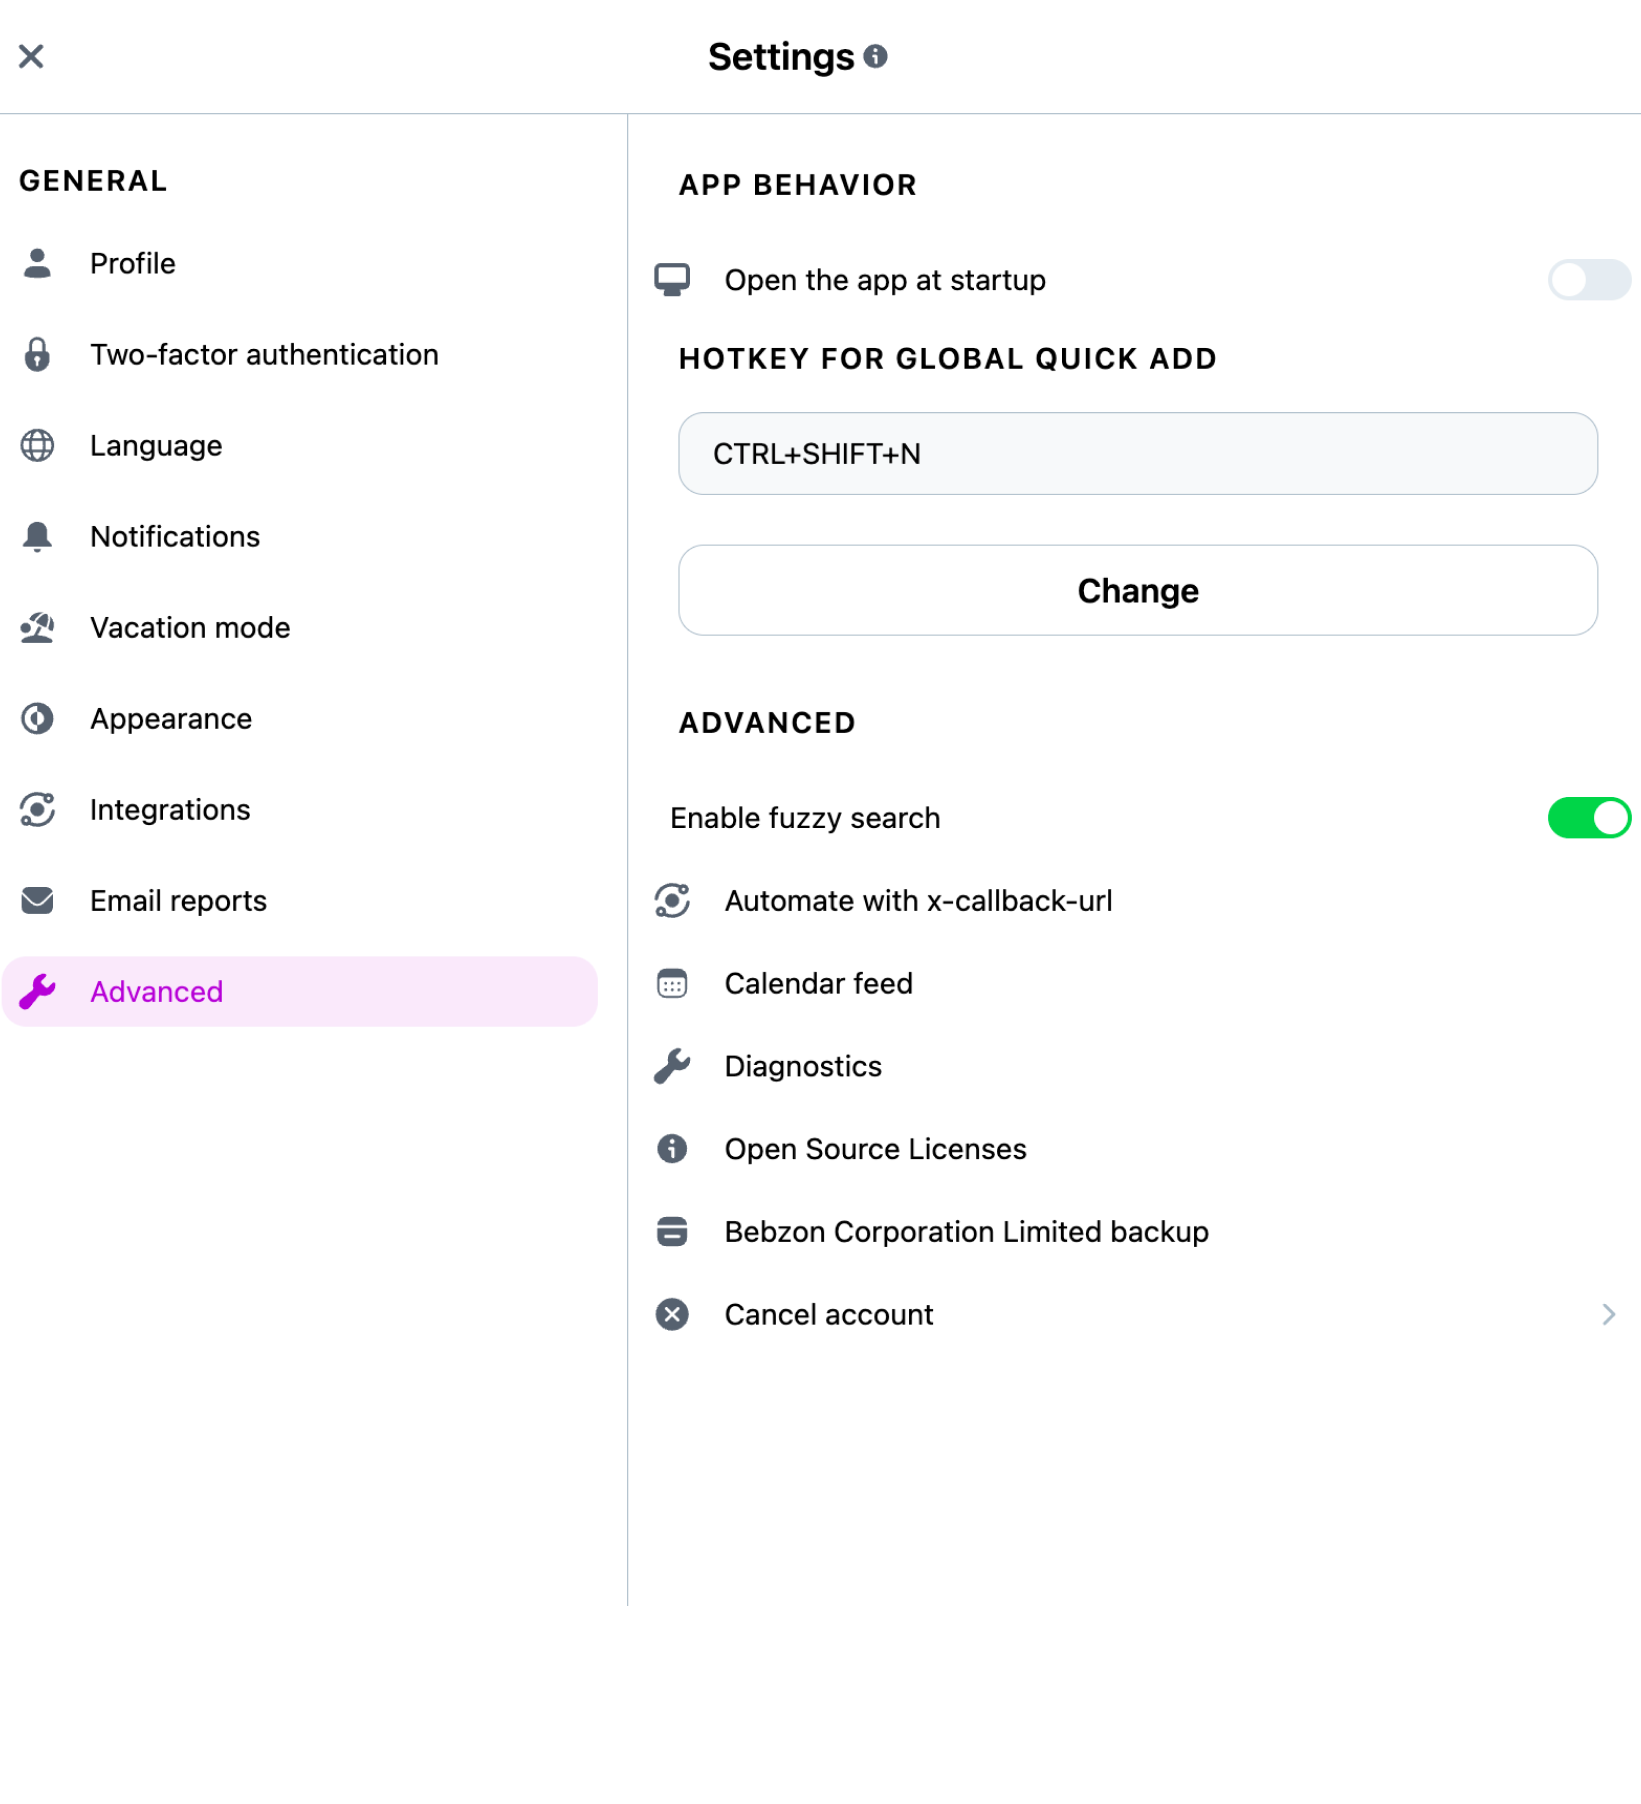
In this section, you’ll find more advanced options to customize and optimize your Nozbe experience. Below is a description of each available feature.
App behavior
If you use one of our desktop apps - Nozbe for macOS or Nozbe for Windows - you can choose to have the app open automatically when your computer starts up.
Hotkey for Global Quick Add
On the desktop apps - Nozbe for macOS or Nozbe for Windows - you can customize the default keyboard shortcut for the Global Quick Add feature, making it easier and faster to add new tasks from anywhere on your computer.
Enable fuzzy search
Turn on or off the fuzzy search mechanism to allow more flexible and forgiving search queries when looking for tasks or projects.
Automate with x-callback-url
Allows you to enable automation using x-callback-url. A feature designed for advanced workflows and app integrations.
Calendar feed
Use the calendar feed to display your Nozbe tasks in calendar apps other than Google Calendar.
Diagnostics
If you encounter technical issues with Nozbe, you may be asked to run diagnostics from Settings → Advanced.
You can run: Basic or Full diagnostics. After running diagnostics, please send us the results along with a brief description of your issue to help us troubleshoot more effectively.
Open Source Licences
Review the open-source licenses for software components used within Nozbe.
Space data backup
As a member of a Nozbe space, you can create a complete backup of the data in the space that you have access to.
When you request a backup, Nozbe will email you a single-use link to download the archive. If you want to download it again later, you’ll need to generate a new backup through your Nozbe settings.
The archive will include:
- All active and completed projects
- All tasks within those projects
- All comments on tasks
- All attachments added by members of your space
Optionally:
CSV files listing your projects, tasks, and comments — you can choose whether to include them when generating the backup You can also choose whether to include attachments in the archive — this gives you control over the backup size and content.
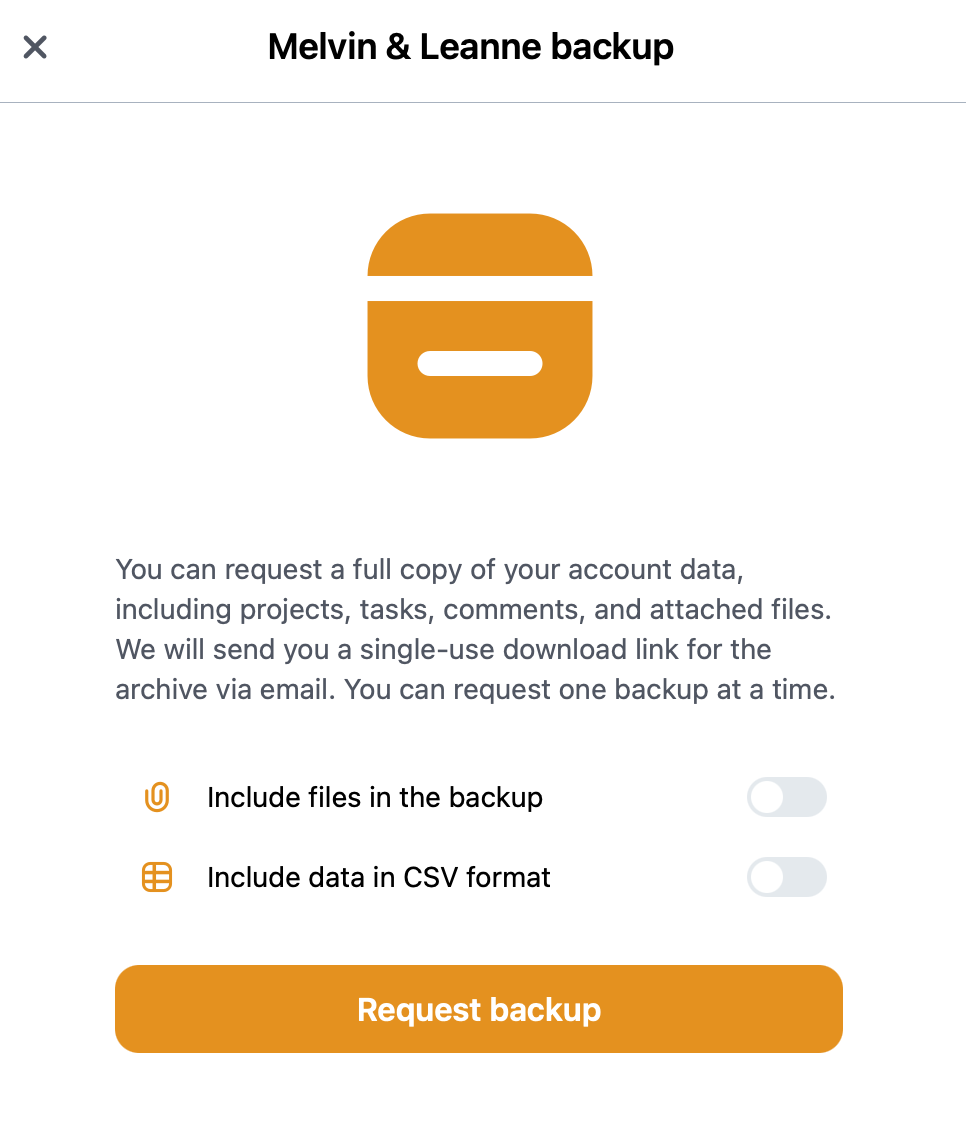
Note: The backup will only include data from projects that you have access to in a given space. It will not contain data from private or limited-access projects owned by other space members.
All private data remains private. And you cannot generate a backup for projects you do not have access to.
If a regular user in a given space creates a private project that they do not invite the owner to, it will not be included in the owner’s backup.
Cancel your account
You can close your account in Settings. To do so, open Settings → Advanced and tap on the “Cancel Account” button.
You will see a window with four different options. You can check the first one to change your email address. If you tap on the second option, you can downgrade your account.
The third option allows you to leave current space. This cannot be undone.
The fourth option removes your account from our database.
Please send us feedback if you decide to cancel your Nozbe account.
Cancelling an account created using Apple or Google Sign-in
If you log in to Nozbe using Sign in with Apple or Sign in with Google, you will need to set up a password for your account first before cancelling your Nozbe account.
To do this, hit the gear icon, then log out from your Nozbe using the “Log out” button. Once logged out, go to the password reset page and enter your account’s email address there. We will send you an email with instructions on how to set up a password.
After setting a password for your account, log in to Nozbe, then proceed with the account cancellation process. To cancel the account, provide the password you’ve just set.
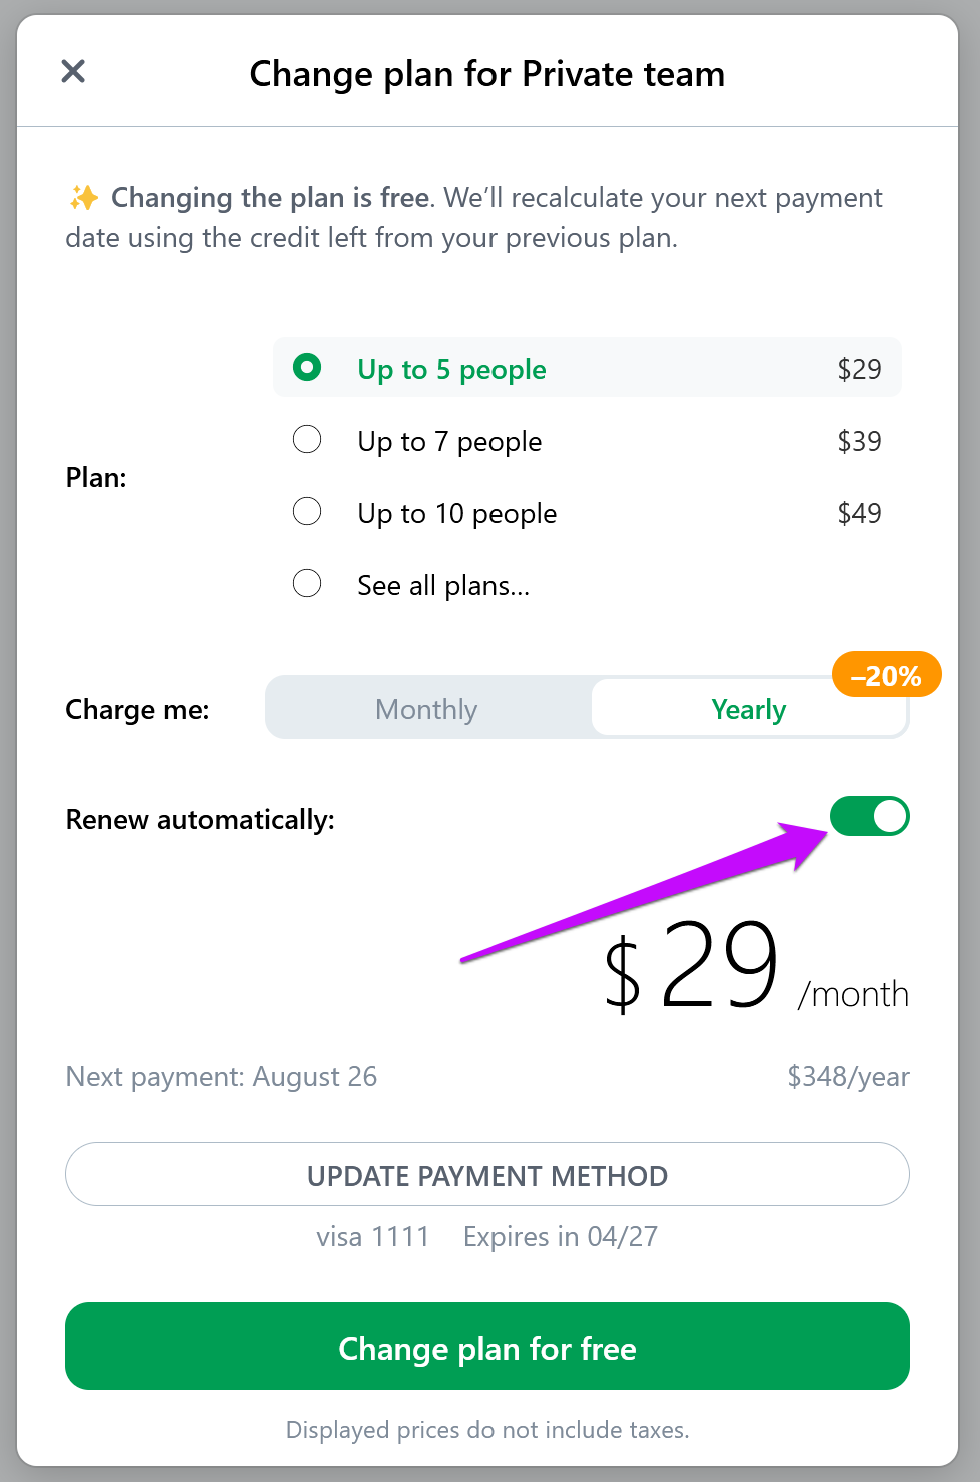
Change of plan and automatic renewal
Hit the gear icon and tap on “Change plan” to choose a new option for your space.
If you wish to turn the automatic renewal off, you have to toggle the auto-renewal switch: